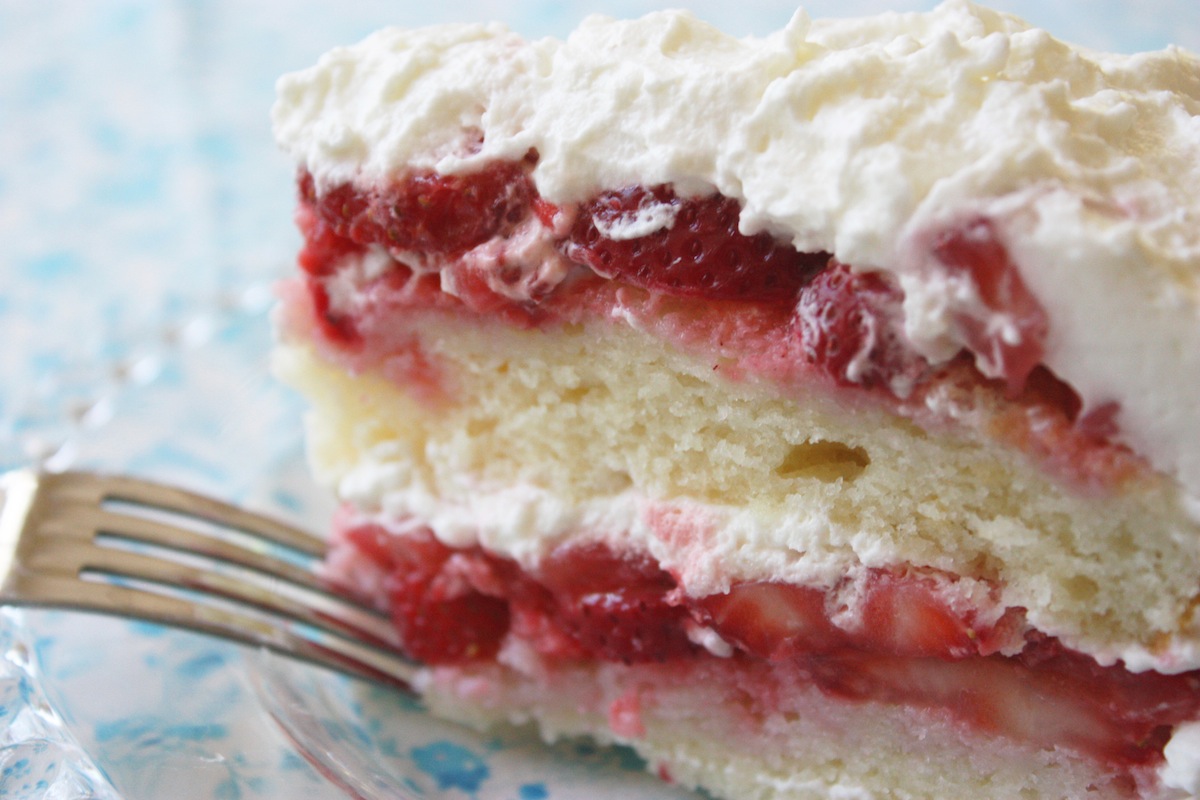
This is what my valentine wants for his special day on Saturday. Of all the things I love to bake, this is the one he asks for on his birthday and on Valentine’s day. He loves it. It’s a white cake filled with two pounds of strawberries and covered with fresh whipped cream. I love it too. So I’ll make this amazing cake for him but it won’t be free. I’m negotiating some terms…
1) Immediate response when there’s a spider in the house – no delays.
2) Never ask if I’m going out wearing that… because I am.
3) Sign my contract that says valentine chocolates don’t have to be shared.
4) The above terms notwithstanding, the strawberry cake must be shared.
Don’t have whole wheat pastry flour? Regular whole wheat flour is not a good substitute for whole wheat pastry flour. It will give you a heavier and more dense product. Whole wheat flour is usually ground hard wheat that is high in gluten and best for baking bread. Whole wheat pastry flour is a much finer grind and is made from a soft wheat low in gluten. It is best for sweets like cakes, muffins, and cookies. Whole wheat pastry flour is available at Whole Foods and can easily be purchased online (King Arthur Flour has it). If you use my recipes regularly it’s worth the effort to find whole wheat pastry flour so you can add whole grains to your homemade baking.
Don’t have buttermilk? You cannot substitute milk for buttermilk. There is no perfect substitute for buttermilk, especially in baking. Due to its acidic nature, buttermilk makes baked goods lighter and fluffier so it’s worth using the real thing. You can freeze unused buttermilk in portions the size you will need for future recipes. It will separate when frozen but when you thaw it, just stir it back up. To substitute for buttermilk, there are several options:
1) Combine yogurt with milk, using plain yogurt and milk, about half and half.
2) Add 1 tablespoon of fresh lemon juice or distilled white vinegar to 1 cup of milk (not fat-free) and let it stand for 5 minutes or longer.
3) Combine sour cream with milk or water until it’s the thickness of buttermilk.
Don’t have bread flour? You can use all purpose flour. Bread flour has more protein than all-purpose flour and that helps with gluten development, which is helpful when working with yeast. With bread flour, pizzas may be a little crispier and breads may be a little chewier and have more body but it’s not a huge difference.
Don’t have instant yeast? Regular active yeast can be used wherever I use instant yeast. But be sure to check the package directions for the required temperature of the liquid. My brand of instant yeast calls for 120 degrees F while my regular active yeast calls for 110 degrees F.
Don’t have 1% milk or low fat milk? Use a mixture of 3 parts water to 1 part whole milk. For example, to make the equivalent of one cup of 1% milk: combine 3/4 cup water + 1/4 cup whole milk. (For 2% milk the mixture should be 50/50, i.e. half water and half whole milk)
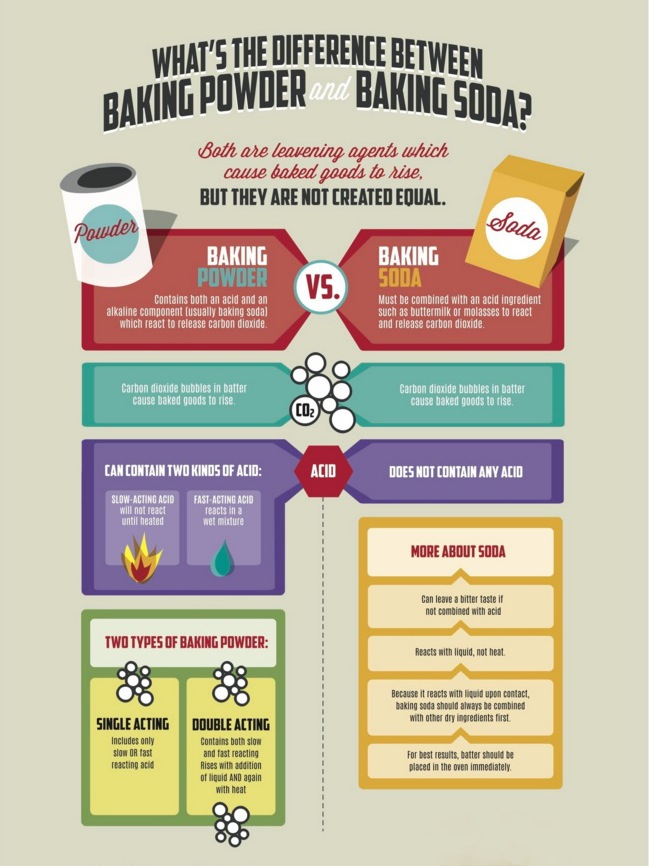
Don’t have baking soda? Do not use baking powder instead. Baking powder is not a substitute for baking soda. Baking soda reacts with acidic ingredients in a recipe to make baked goods rise.
Don’t have extra light olive oil? For baking you can use any vegetable oil. My preference in avocado oil but they are not all the same. Some are too strong for baking. I use Chosen Foods brand avocado oil
Don’t have a Dutch oven? To see what other cooks have used in place of a Dutch oven, click here.
Don’t want to use eggs? I’m sorry to say I don’t know of any good substitute for eggs. For anyone with egg allergies, rather than change a recipe and risk being disappointed, you can find many eggless recipes the are already proven online. If cholesterol is a concern, all my research has shown that egg yolks may contain cholesterol but they are low in saturated fat and they do not raise serum cholesterol in the blood. Eggs also contain nutrients that may help lower the risk for heart disease, including vitamin B12, riboflavin, and folate. Besides providing protein, iron, phosphorus, iodine, and vitamin E, eggs are also one of the few natural sources of vitamin D.
Baking powder and baking soda are NOT THE SAME. They can not be substituted for one another. They are both leaveners but they are chemically different.
Baking soda is used in recipes that contain acidic ingredients like buttermilk, brown sugar, yogurt, lemon juice, honey, vinegar, or chocolate (except Dutch process). The acid in the recipe reacts with the baking soda, allowing your baked goods to rise. Baking powder is generally used when there is no acidic ingredient in the recipe. Bottom line: baking soda needs an acid; baking powder does not. – Jenny Jones
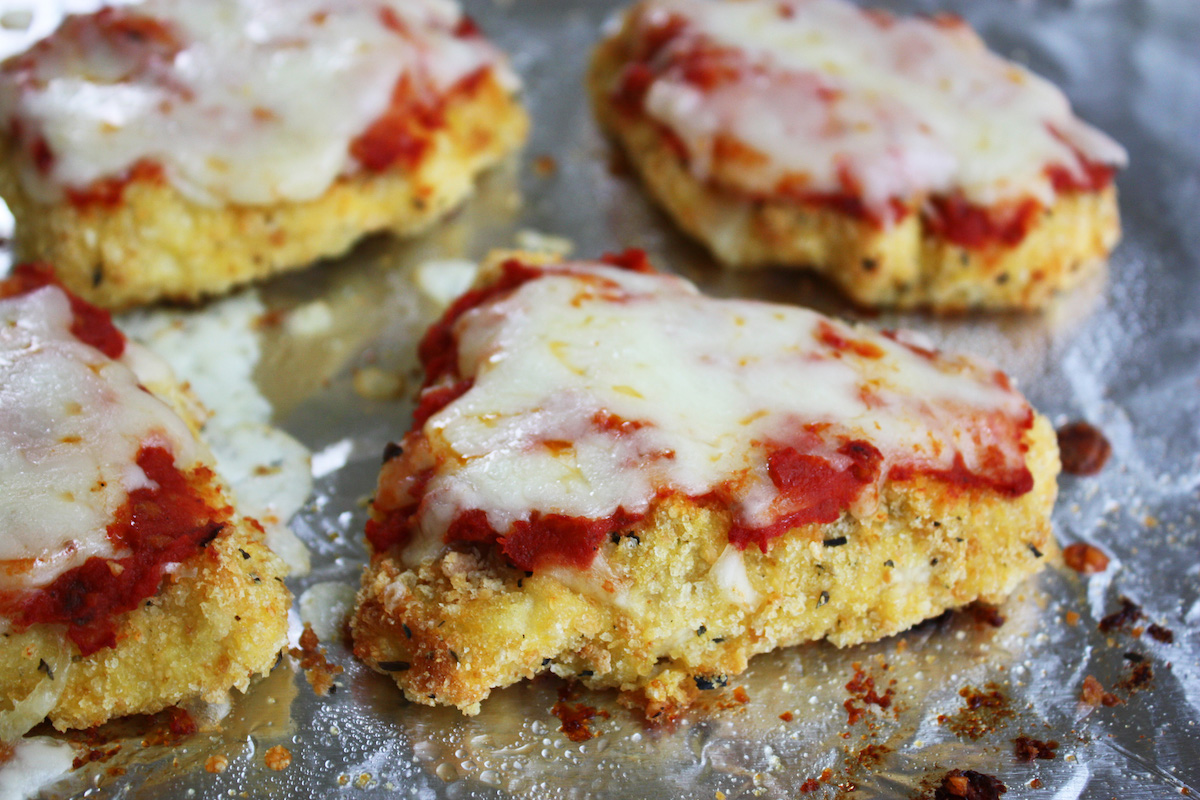
There’s almost no cleanup with my easy chicken parmesan recipe. The prep is all done on wax paper and if you line your baking sheet with foil like I do, you won’t have to wash it. This recipe will convince you that frying is not necessary to make a fabulous chicken parmesan. First I pound the chicken to an even thickness of 1/2-inch. That’s to make sure it cooks evenly. Then I dip each piece in flour, beaten egg, and finally coat it with (homemade) bread crumbs that I season myself.
I start with plain breadcrumbs and season them with a store-bought Italian seasoning mix. Then I add parmesan cheese and it makes an delicious breading for these chicken cutlets. They bake for 20 minutes… oh hey… that’s just how long it takes to make my quick and easy marinara sauce, start-to-finish. After 20 minutes, top it with some sauce and shredded mozzarella cheese, bake a few more minutes and… yummm! I always shred my own cheese because packaged pre-shredded cheese does not melt as well.
The last time I made this I baked it at 425 for 17 minutes and it was a bit more crispy but it’s not much of a difference. This photo above was baked at 425. Let me know if you try the higher temperature.
Who doesn’t like chicken parmesan? Now you can make a healthier chicken parm topped with part skim mozarella to keep it low fat and light. This is truly Italian comfort food. Click here for the recipe. – Jenny Jones
Make it overnight. I finally figured out the best way to make whole wheat no knead bread. Start the dough the night before using cold water instead of using the faster method with hot water. The faster method works well with regular bread made with bread flour or all-purpose flour but the faster method using 100% whole wheat flour makes a loaf that was too dense for a lot of people. I happen to love a dense, heavy bread, even those thin-sliced pumpernickel breads that they sell but I think most people will be more satisfied with the overnight method.
But know this: any bread that’s 100% whole wheat, no matter how it’s made, will never be as soft and light as a white bread version. But if you want a healthy, high fiber, nutritious bread, this one takes more time but there’s still nothing to do but wait. There’s no kneading and no shaping. Just start your dough the night before, let it stand at room temperature for 12 hours or more, then continue in the morning.
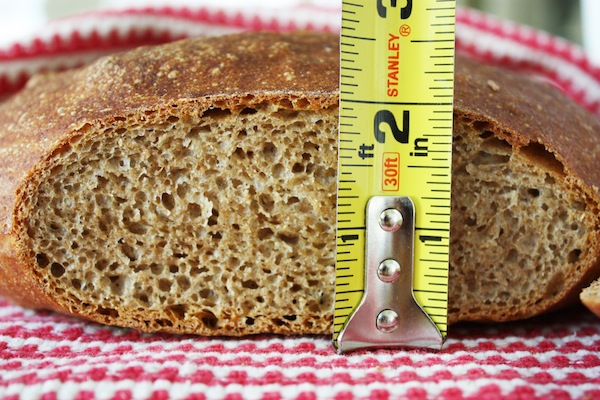
Here’s the truth about no knead 100% whole wheat bread. It won’t rise as much as the white version. I even took a picture of one I made this morning (started the dough last night) and used a tape measure. The middle of the loaf is no more than 2 1/2 to 3 inches tall but you can see the inside has lots of holes and it has a wonderful crust and soft interior. For anyone trying to avoid white flour, this is still the easiest and best 100% whole wheat bread you can make. You just need a little more time but it’s so worth it. Click here for the recipe. – Jenny Jones
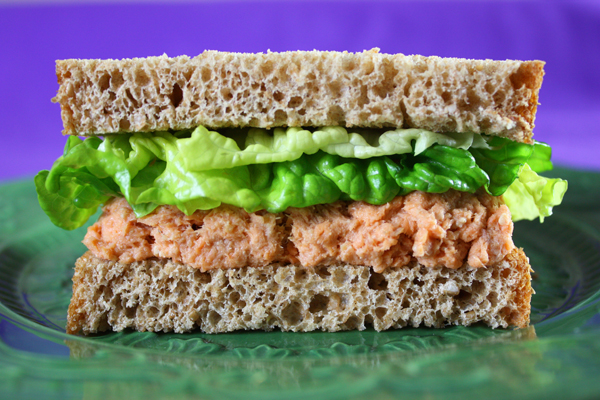
A recipe for a simple sandwich? Yes, and I’ll tell you why. This salmon sandwich is healthy enough to have for dinner! Think about it. You have an excellent protein in the fish, whole grains in the bread, and a vegetable in the lettuce. Then there’s the long list of red salmon health benefits from benefiting your heart to your bones. I grew up in Canada. We do salmon sandwiches. I never had a tuna sandwich until I was 25. I always have canned salmon at home so I often have a salmon sandwich for lunch and when time was short I’ve had one for dinner.
I never expected to be posting a sandwich recipe but I think I have to. I had some friends over recently and wanted to offer something different so I made salmon sandwiches… really simple salmon sandwiches. Salmon & mayo. I wondered if anyone would even want them but was shocked at the reaction. They devoured all my sandwiches (I should have made more) but not only that, they asked for the recipe. I had no recipe. I just mashed the salmon with my light mayo and that was it. I couldn’t even tell them how much mayo – I just eyeballed it.
Then the following week two people told me they couldn’t find the salmon sandwich recipe on my website. If they liked it that much, then I need to share it with everybody. So I measured the amount of mayo and now I have a recipe. It’s the easiest recipe I have ever posted, but one you will probably love just like my friends did. Click here for the recipe. – Jenny Jones
With visitors from all over the world (over 170 countries) there was some confusion about the spices in my marinade so I have added a simpler combination of orange & lemon juice, garlic and salt. I made another change too by reducing the cooking time and increasing the oven temperature.
Like most cooks, my recipes evolve over time because I’m always trying to make things better. That’s why I created a special category in my blog called “Recipe Changes/Fixes” so if anyone is confused, thinking something is different than they remember, they can check on any changes I made in that blog posting.
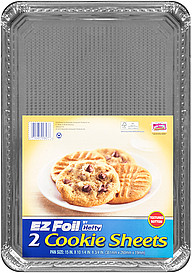
I’m still working on avoiding the messy job of cleaning the rack. I tried roasting the drumsticks on greased foil but they stick to the foil even when it’s greased. I did find one thing, however, that is a disposable foil pan that allowed me to eliminate the rack.
It’s called EZ Foil by Hefty and these cookie sheets are textured on the bottom and there was no sticking whatsoever, and no greasing necessary. The drumsticks turned over beautifully with no effort at all. I’m guessing not all stores will carry these sheets but wow, I love the textured feature. And oh… good news: I wash and re-use them.
I almost always make these skinless chicken drumsticks on Fridays because they make great weekend snacks, even served cold. Click herefor the recipe. – Jenny Jones
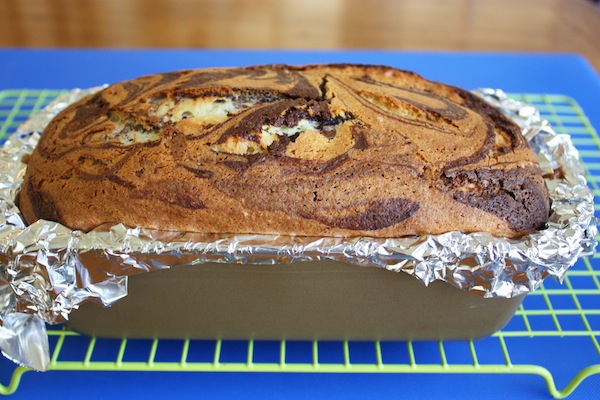
I just posted the updated recipe for my marble loaf cake that I love so much. I went back to the original way that I was making it, which involved beating egg whites and folding them into the batter at the end. I had eliminated that step to make the recipe easier and less work but after making it a few times, I realized I should have left it alone.
So… good news / bad news. The good news is the loaf is light and fluffy again and the bad news is it takes a little more work – well just the one extra step of beating the egg whites.
If you hate washing pans (who doesn’t?) you will like this. If you do what I do and line the loaf pan completely with foil, you won’t have to wash the pan. And I don’t even grease the foil but you can if you want to. I just peel away the foil from the loaf, after about 15 minutes of cooling. But be careful when putting in the foil and use your knuckles in the corners so it doesn’t tear.
You’ll notice that I beat the egg whites first. When beating egg whites there must be no fat whatsoever in the bowl, not from the yolk or from beaters not are not completely clean. So use your clean beaters on the whites first. Now you can continue using the beaters on the second mixture without having to clean them first. My first recipe had fresh orange zest added and that is still an option. You can add the zest of an orange along with the flour but I like it both ways, with and without the orange zest.
This marble loaf is the first thing I make for company because it makes a beautiful presentation and goes really well with coffee or tea. And people will be amazed when you say, “There’s no butter at all in this cake.” I hope you’ll try my new, updated marble loaf cake. Click here for the new recipe. (Still want the old recipe? Click here) – Jenny Jones
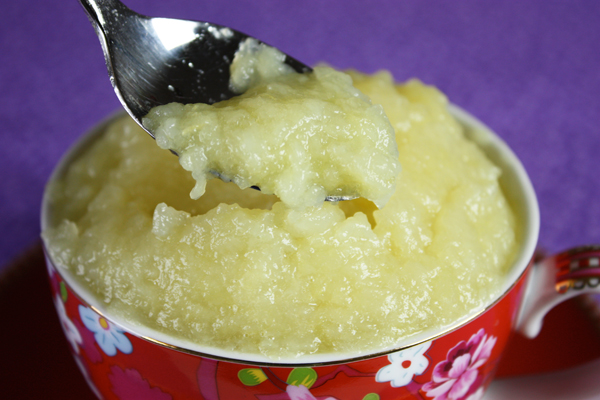
Wait until you experience the taste of fresh apple sauce. You won’t want to buy it any more. Fresh homemade applesauce is so good, I sometimes eat it with a spoon as my dessert. I see lots of recipes with added sugar and stuff, but here’s the thing. Apples are sweet. They don’t need added sugar so this is the easiest, and healthiest, thing to make. You just cook some apples. Just peel, core, and chop them up and add a little water in the pan to get the cooking started.
You can have fun trying it with different varieties of apples. Not all apples taste the same. Granny Smith are good for baking but to me, not sweet enough for apple sauce. My favorite for sauce is gala but do you have any idea the number of different apple varieties that exist in the world? Seven thousand! You heard me. That’s 7,000! Here are just a few that I’ve actually seen: Rome, Braeburn, Cortland, Crispin, McIntosh, Fuji, Golden Delicious, Red Delicious, Gravenstein, Liberty, Jonamac, Ida Red, Criterion, Winesap, Pippin, Elstar, Cameo, Pink Lady, Spartan, Newton, Sunrise, Empire, Ginger Gold, Red Cort, Northern Spy, Almata, Gold Russet, Maiden’s Blush, Crimson Gold, Dorsett, Honey Crisp, Honey Gold, Winesap, and Anna (I grow my own Anna apples). I get to keep the ones the squirrels don’t eat!
The point is, you can come up with a lot of different flavors of apple sauce depending on the type of apple, or use a combination of different varieties. Have fun with this simple, easy healthy snack. Click here for the recipe. – Jenny Jones
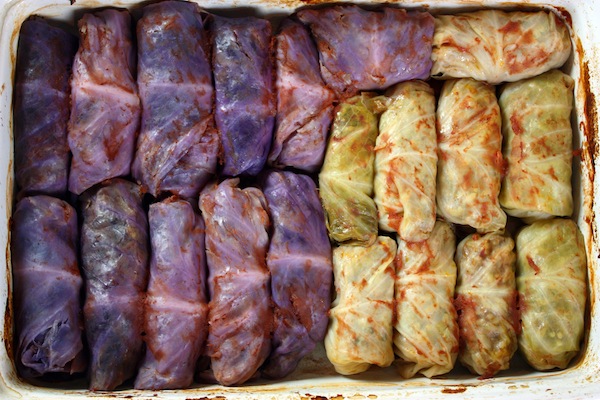
I always wondered if cabbage rolls made with red cabbage would turn out and now I can report on my experiment. I already knew from eating lots of cabbage salads that red cabbage is a little tougher than the green one. That turned out to be true even when the leaves are softened for cabbage rolls. I boiled the whole head of red cabbage for ten minutes, just like I do the green one for my cabbage rolls. The leaves didn’t seem soft enough so I put them back in for another few minutes and they seemed a little softer. I then proceeded as usual, cutting off the thick spine to make them easy to roll.
The main difference occured when rolling. I made both green and red ones so I could really compare and the green leaves rolled up beautifully and didn’t tear or break. But some of the red ones tended to break and crack so I had to patch the crack and then roll up my golabki. So the red leaves were a little harder to work with but I must say they do look good.
And the taste? Wonderful, just like the green ones. So my summary is… if you are making cabbage rolls for the first time, stick with the green cabbage. The soft leaves will be easier to roll and you will be confident in making them again. If you make them in red, just be prepared for a little extra work if they tear but that can happen with green leaves too. When it happens, you remove the filling, lay an extra piece of a cabbage leaf over the tear, fully covering and overlapping the tear, then add your filling and roll it up.
Cabbage rolls made with red cabbage make a beautiful presentation and once they are cooked, the red rolls are just as tender as the green ones. So there is my report. I will definitely make red cabbage rolls again if only for the reaction I’m sure to get when I put them on the table.
My Polish cabbage rolls recipe has been very popular and I’m thrilled with the number of people who have made and love them. Over 1/4 million people (update February 2021 – over 15 million!) If you haven’t made stuffed cabbage yet, click here for the recipe. – Jenny Jones