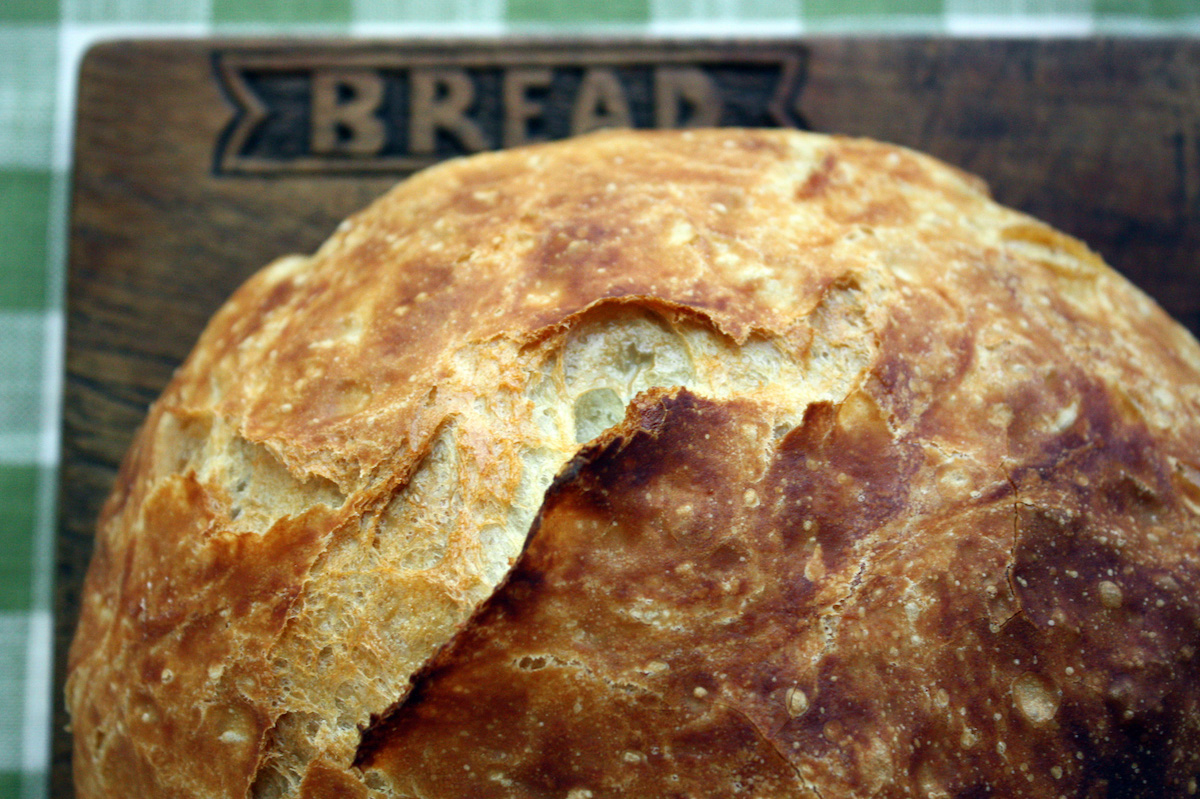
The fact is that homemade bread will not keep as well as store bought bread but in spite of that, homemade bread will always taste better. It’s best enjoyed the first day so after you have slathered the first few slices with butter (oh, yeah! ?) freezing what’s left on the first day is the best idea. I suggest slicing and freezing it so you can thaw only the slices you need. (I separate my slices between wax paper for easy separation.)
If you do not freeze your bread the first day, here are a few tips:
1. Crusty bread can be stored uncovered at room temperature for the first day. By the end of the day, it’s best to wrap it in foil (not plastic) or in a paper bag and kept at room temperature for a second day. After the second day, it’s really best to freeze it.
2. Crusty bread will not be crusty the second day. You can re-crisp it by putting it cut side down on a piece of foil and place in a preheated 325° F oven, directly on your oven rack, for about 7-10 minutes.
3. Crusty bread should not be stored in plastic, which softens the crust. Aluminum foil is a better choice.
4. Crusty rolls are best frozen the day they are baked. To re-crisp, place frozen rolls directly on the oven rack in a preheated 325° F oven for 10-12 minutes. They’ll be even more crispy than first-baked.
5. A standard soft loaf is best stored tightly wrapped in foil or plastic at room temperature up to 2 days and after that should be refrigerated or frozen.
There is a lot of differing information available about storing homemade bread – not everyone agrees with storing bread in the refrigerator but it works for me. Feel free to add your own tips if you like. – Jenny Jones
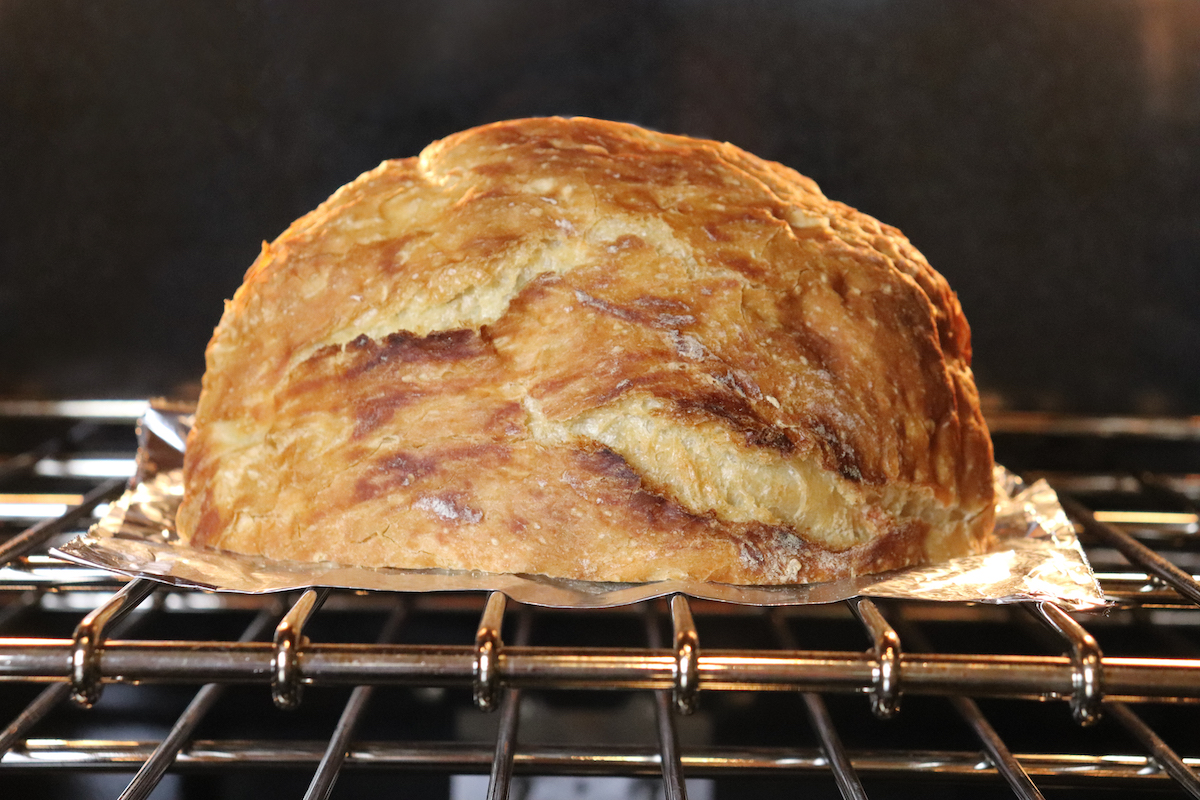
For anyone wondering how to re-crisp a crusty loaf of bread, here’s how I do it. A lot of us are making no knead breads and the crusts don’t stay crispy forever. My way of restoring the crust is to put it back in the oven but you don’t want to dry out the cut side. Once the loaf is cut I press some foil on the cut side and place the loaf cut side down directly on the oven rack (the oven should be preheated to 325°F). I tried spraying the crust with water first and it didn’t seem to make much difference. Bake the loaf for 7-10 minutes and it will crisp right back up.
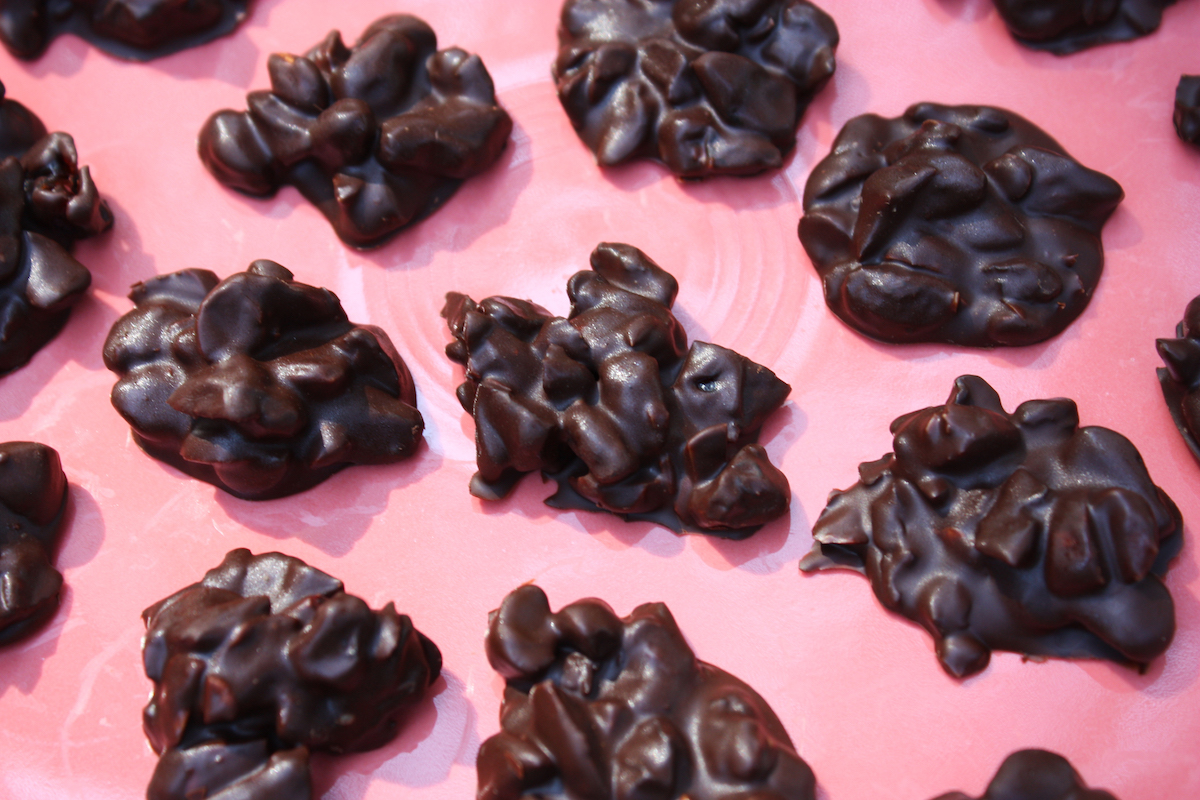
This is a variation of my chocolate almond clusters and I love it. Instead of using whole almonds, I chopped them into pieces and added some chopped dried cherries and raisins. The result is a wonderfully chewy, dark chocolate, healthy sweet treat full of protein, heart-healthy fats, antioxidants and fiber. I used a dark chocolate bar (72% cacao) from World Market and followed the same process as my original recipe but instead of using tiny paper cups, I just dropped the clusters onto wax paper, let them cool, and then refrigerate.
The easiest way to refrigerate them is to slide a cutting board under the wax paper and place the whole thing in the fridge until the clusters are cold and set. Then you can put them all into a covered container but always keep them refrigerated; otherwise, the chocolate will melt in your hands. Next time you’re craving a chocolate bar or some m&m’s, try this healthier homemade fruit & nut dark chocolate cluster. Click here for the recipe. – Jenny Jones
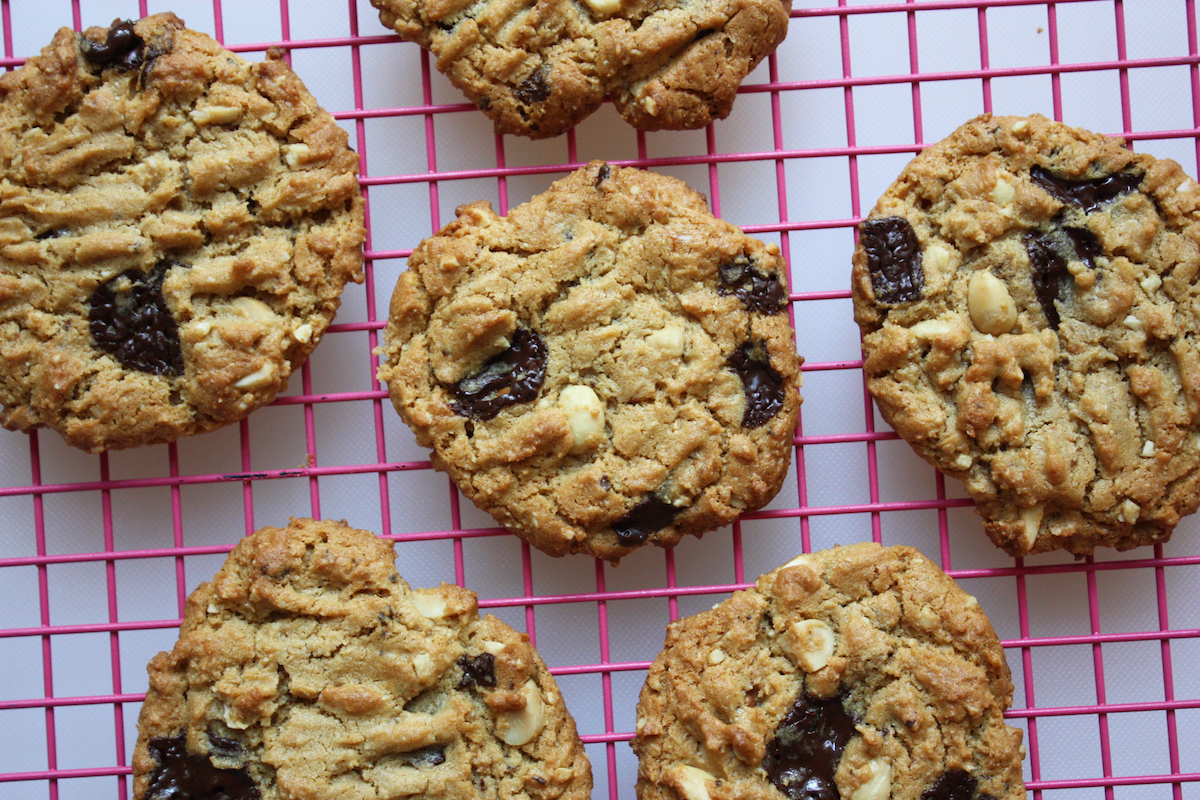
These are not raisins – they’re melted chunks of dark chocolate. I wanted an easy dessert and he wanted chocolate. So I made my easy peanut butter cookie recipe with added dark chocolate… oh and some extra added peanuts too. This recipe is so flexible and they turned out fantastic. I chopped up about 1/3 of a 72% dark chocolate bar from World Market but you could use Ghirardelli dark chocolate chips, and then I chopped up some roasted peanuts. I stirred them all into the simple cookie dough and wow, they were good.
Even if you make the original peanut butter cookie recipe, you will love that they have no flour and there is no butter or oil. So they are gluten free, healthy, and super easy to make. Click here for the recipe. – Jenny Jones
I love seeing your photos of my recipes and it helps other cooks see what someone else’s dish looks like. Of course it’s always nice if you share where you are from. Please send your photo to: YourPhotos@JennyCanCook.com
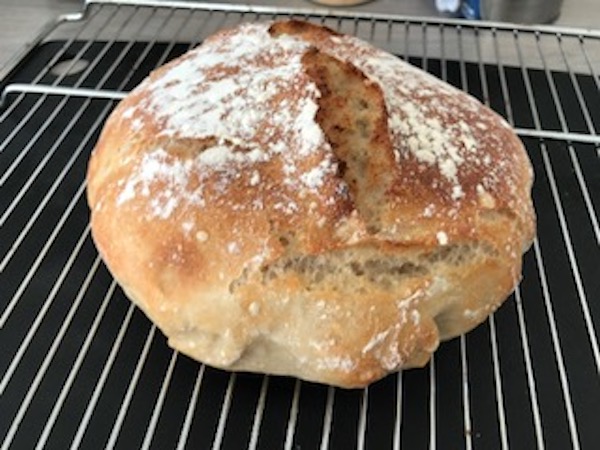
PAMELA MADE MY NO KNEAD RYE BREAD “Hi Jenny, I used a cup of semolina flour instead of whole wheat, This was so good!”
~ This shows just how flexible this method can be. Thanks for the photo! ~ jenny
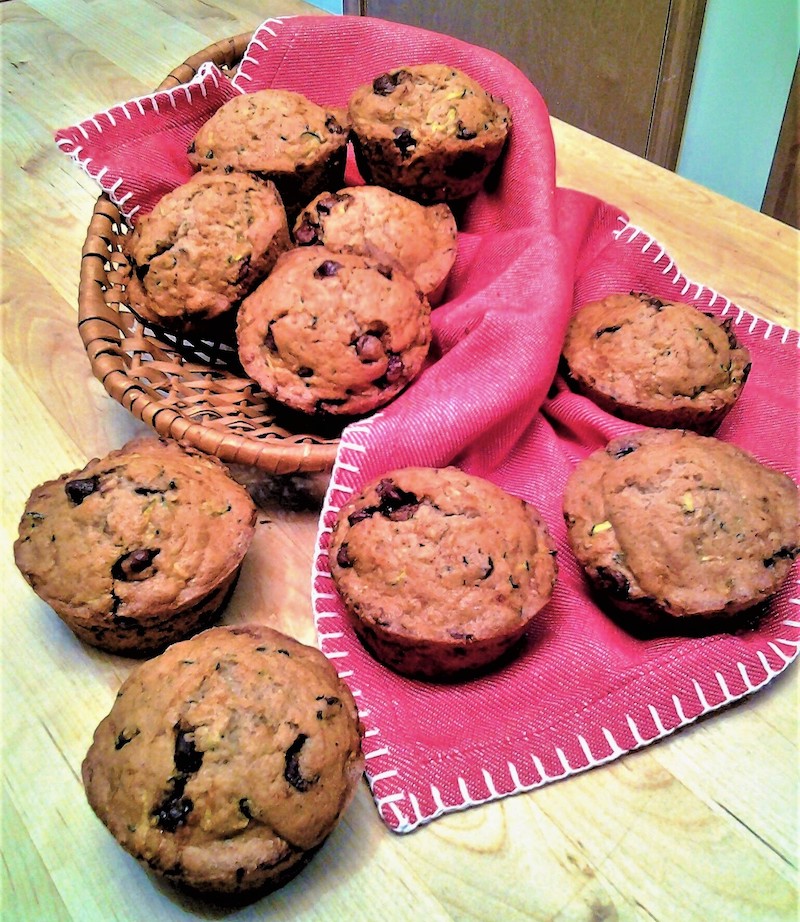
DALILA MADE MY MUFFINS “Hi Jenny! I made muffins using your recipe for PUMPKIN CHOCOLATE CHIP MUFFINS with a change. Your recipes ALWAYS turn out great for me that I decided to play with this one. I used shredded zucchini instead of the canned pumpkin. Seeing that I didn’t use canned pumpkin I omitted the nutmeg and added vanilla extract. I ran out of my whole grain pastry flour so I used all purpose flour only. Added some sugar for sweetness, sorry, couldn’t help myself, I do love my sweets! And wah-lah….Zucchini Chocolate Chip Muffins! Thank you Jenny for inspiring me to experiment in my baking adventures with you, you are a “Baking-Star”!! Have a fabulous day! Happy Baking! ?”
~ I’m happy to be your inspiration. Thank you for sharing. ~ jenny
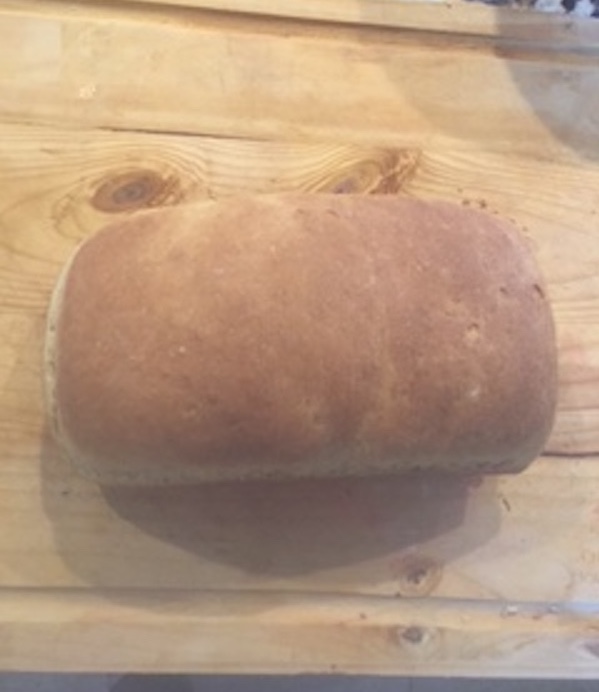
SRIVALLI MADE MY WHOLE WHEAT BREAD “Thank you so much Jenny you have the best whole wheat bread recipe! I love it!”
~ I’m glad to hear it. Yours turned out really well, thank you. ~ jenny
SUSAN MADE MY NO KNEAD BREAD “Hi Jenny. This is my first attempt at this recipe and I’m thrilled! Have subscribed and shared with my sister. Lots more to try now, can’t wait. Love from Susan in London, UK”
~ Thank you for sharing. You’re from London (UK) and I’m from London (Canada!) ~ jenny
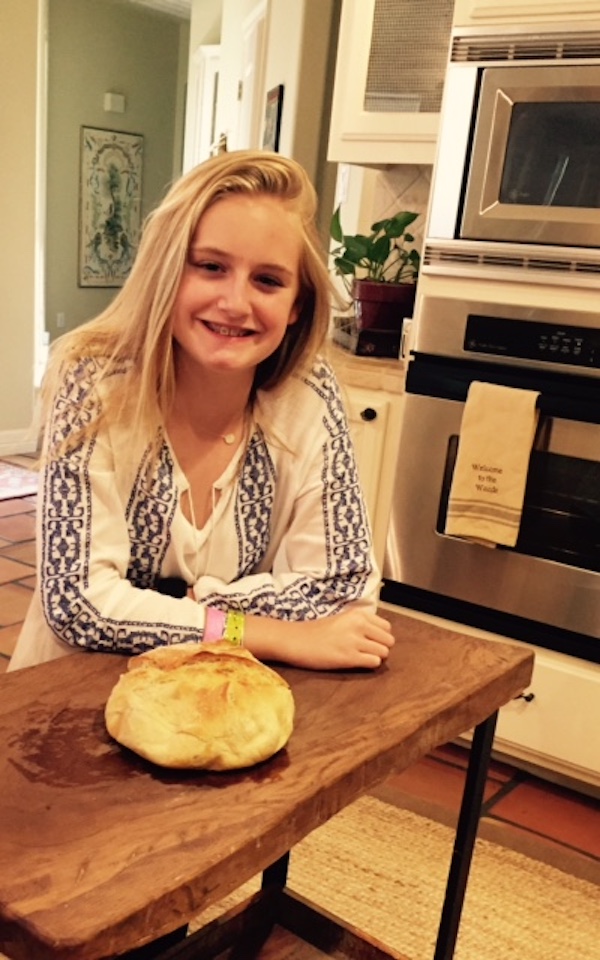
SANDY’S GRANDAUGHTER MADE MY 2-HOUR NO KNEAD BREAD “My 13 year old granddaughter made the ‘No Knead’ fastest bread today. Sensational taste! I’m going to try whole wheat flour next time. Great recipe, Jennie. Thanks.”
~ I love to see young people cooking and baking. Great job!~ jenny
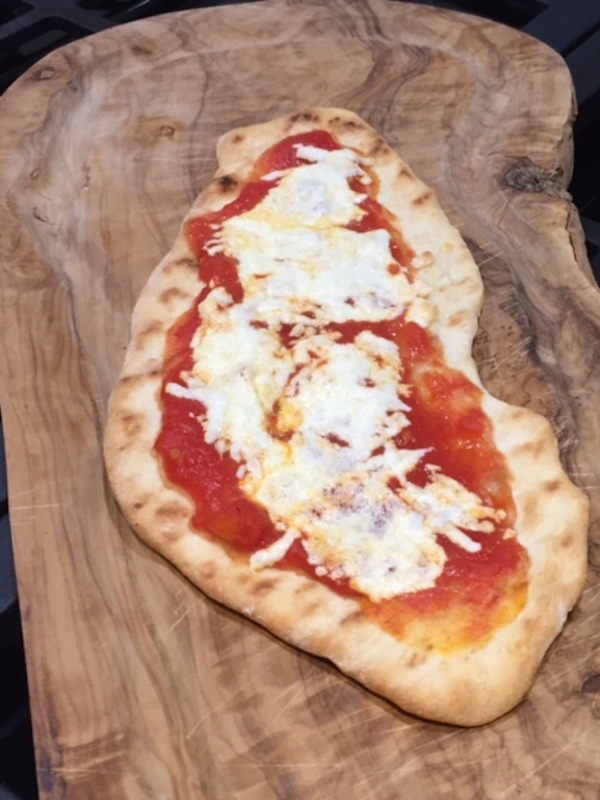
LORRAINE MADE MY PIZZA DOUGH “Hi Jenny! I stumbled upon your YouTube videos last night and I’m obsessed. I have never had any luck cooking with yeast but your videos gave me confidence to try again. The first thing I tried was the pizza dough and it gets 2 thumbs up! Yumm! Thank you for the delicious recipes and for the confidence to try recipes that require using yeast. I adore your humor and can’t wait to try another of your recipes. Here is a photo of my pizza. I started on the stove top using a cast iron grill pan, flipped the dough when it was brown, applied my very simple tomatoes and fresh mozzarella topping then finished it off in the oven. It was perfect. Happy cooking!”
~ Your crust looks great and I love the free-form idea. ~ jenny
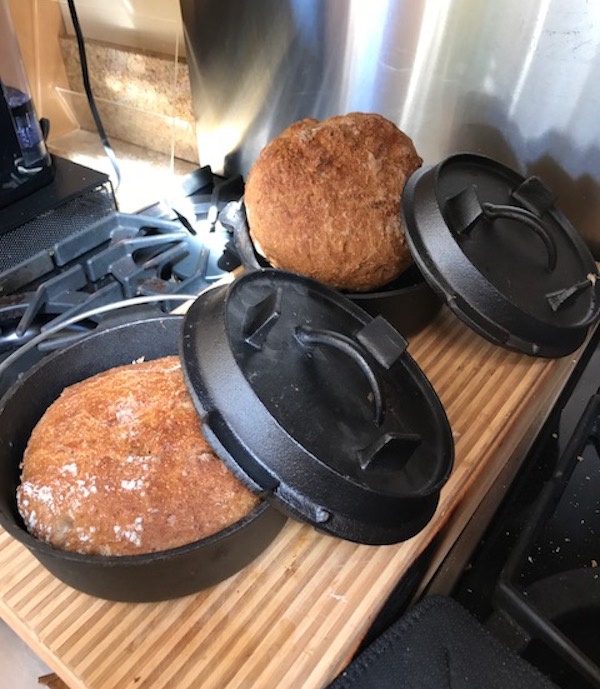
JACKIE MADE MY 2-HOUR WHITE AND RYE NO KNEAD BREADS “Gone bread crazy! Hi Jenny, I made the even faster white and tried it on the rye bread and it worked! Bread in 2 hours woopee!!I call it kitchen therapy !!”
~ I’m so glad the rye bread worked too. Thanks for the inspiring photo. ~ jenny“Hi Jenny!I found these adorable cast iron baby Dutch oven’s at Winco at a fraction of the price of a large Dutch oven. Now I can bake two loaves at the same time! Because of their small size they are easier to store as well. Pictured are two loaves of even faster rye bread.” ~ Jackie L
DALILA MADE MY CRISPY APPLE TART “Hi Jenny! ? I made your CRISPY APPLE TART for a small get together with family. It was a wonderful dessert to end our meal with, so delicious! I used a removable bottom tart pan. Everyone loved it and because it had ‘apples’ in it no one felt bad eating two pieces…LOL!? I would highly recommend this CRISPY APPLE TART, it must be made, it’s just lovely! Thank you Jenny for sharing another fantastic recipe with us. Happy Baking! ?”
~ A tart pan is a great idea and makes beautiful edges. Thank you for sharing. ~ jenny
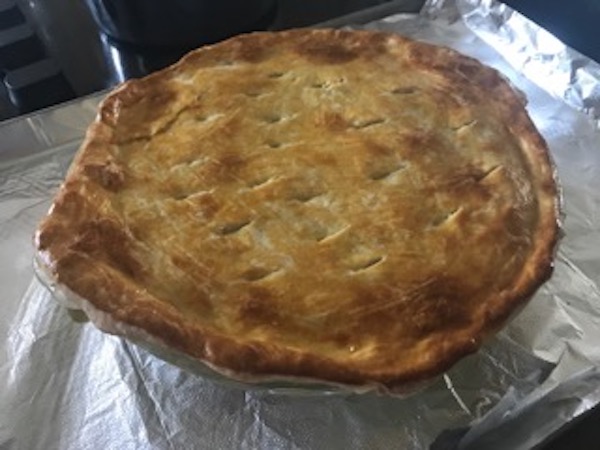
KIM MADE MY CHICKEN POT PIE & PAN PIZZA “My dish this week-Huge praise from hungry kids: Thank you so much for your great help making yummy meals, healthy and tasty. I made chicken pot pie and pizza this week. Made a few other items as well, but don’t have pictures. Thank you for making my life easier. Happy kids and husband. They loved it. Making pizza tonight for a party. But this time I got your turkey to go on top. 🙂 thank you. ~ Kim Anderson from Oklahoma.”
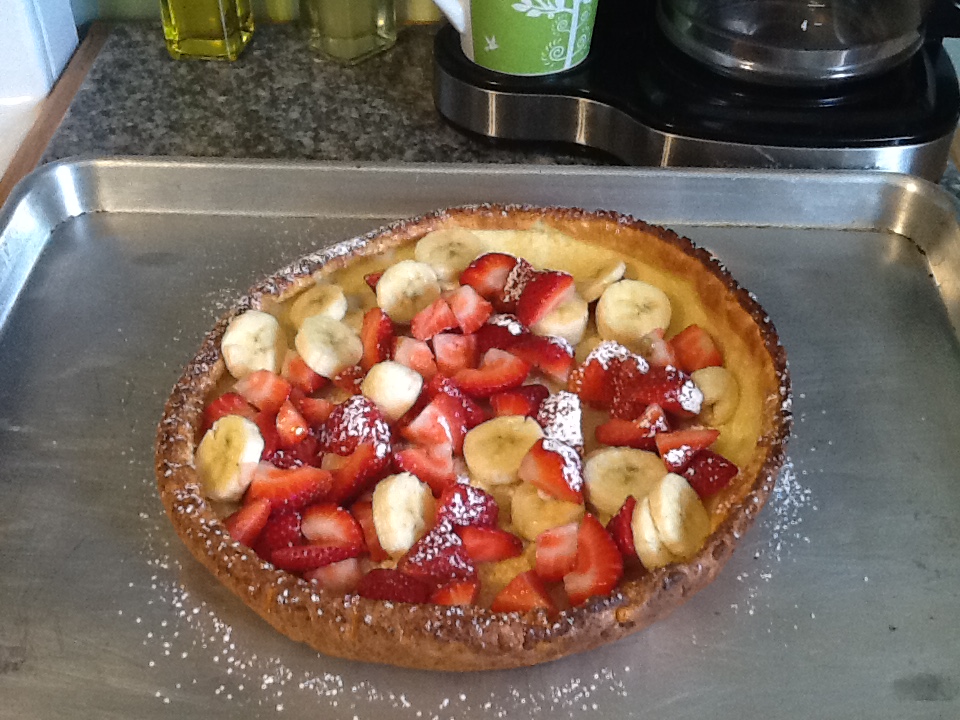
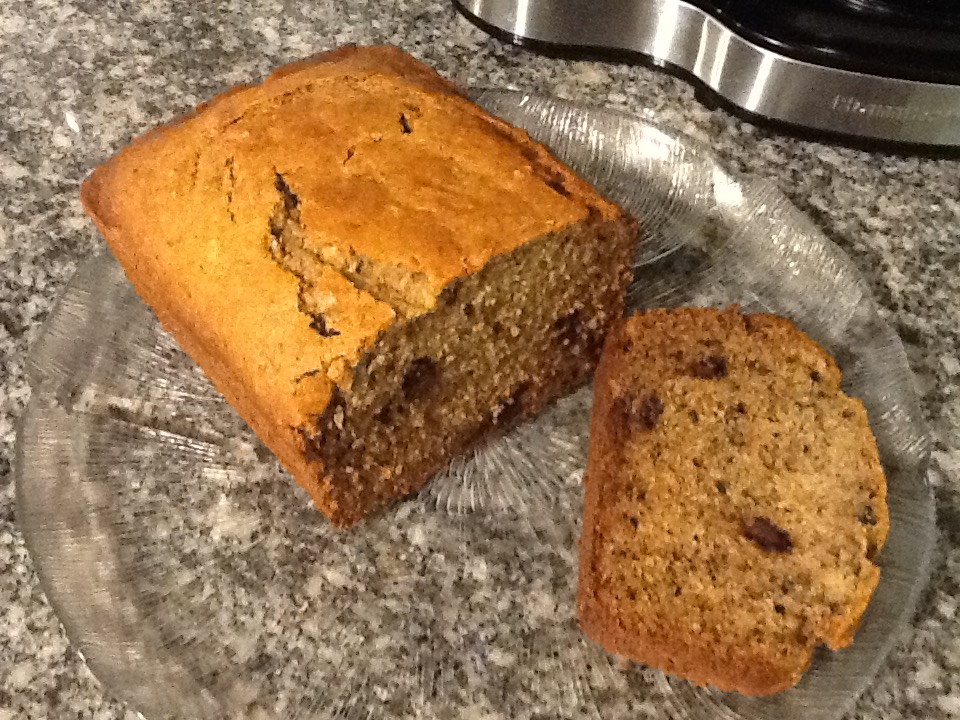
~ I’m so glad to know I’ve made your life easier. Thanks for the photos! ~ jennyBRENDA MADE MY DUTCH BABY PANCAKE & BANANA CHOC. CHIP BREAD “Hi Jenny, I made your Dutch Baby recipe and it was delicious. I will definitely make it again. And I made your chocolate chip banana bread recipe and of course it was delicious.”
~ Thank you for sending two photos. And a mountain of fruit is the healthiest way to serve a Dutch baby. ~ jenny
Summer officially starts today and so does my summer vacation! Please continue to enjoy my recipes while I’m away. I will be checking in but can’t always answer questions so please look to the FAQs for answers. Meantime, I hope everyone has a wonderful summer. Stay hydrated, eat well, and use sunscreen! See you soon. – Jenny Jones
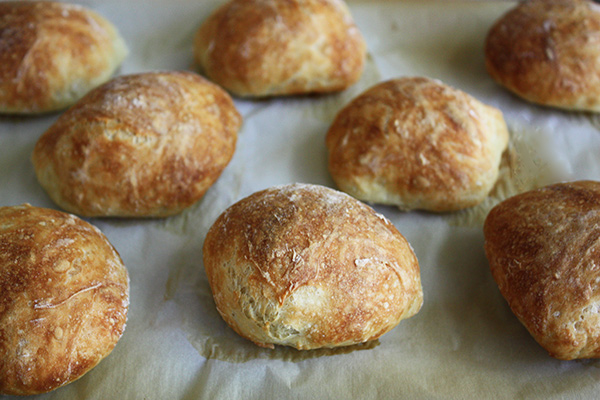
Make ahead dinner rolls are the best way to have fresh, crispy rolls whenever you want because day old bread is never as good as bread or rolls just out of the oven. So when I make my no knead crusty rolls, I freeze them within a few hours. It’s so easy to reheat and re-crisp these dinner rolls whenever you need them, even at the last minute.
The best way to reheat my crusty dinner rolls is straight from the freezer to the oven. First, preheat the oven to 325° F and just place the frozen rolls right on the oven rack (no baking pan) for 10 to 12 minutes. They will be even more crusty than when first baked.
There’s no need to thaw them overnight in the fridge. From my experience this is the best way to reheat crusty rolls. They’ll be super crispy on the outside and soft and moist inside. And if you haven’t tried these easy no knead rolls (they are one of my most popular recipes) try them and see how easy there are to make. – Click here for the recipe. – Jenny Jones
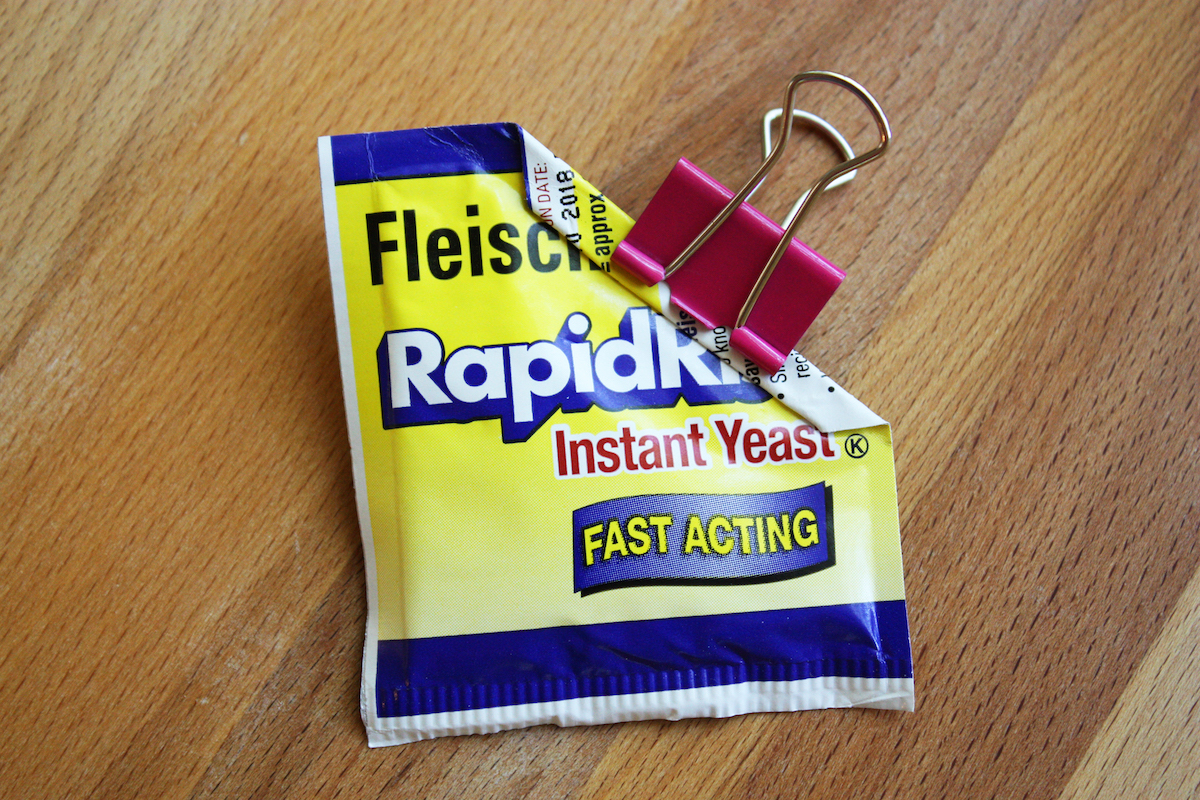
Yeast has a short shelf life and once any package of yeast has been opened, it should be kept in the freezer. I always use the small packets and I find that using a butterfly clip, the kind you can get at an office supply store, is a good way to seal up the packet for freezing. A paper clip would also work. I snip off the corner of the packet, measure what I need, fold the open corner over twice and seal it with the clip. Then I pop it in the freezer. – Jenny Jones
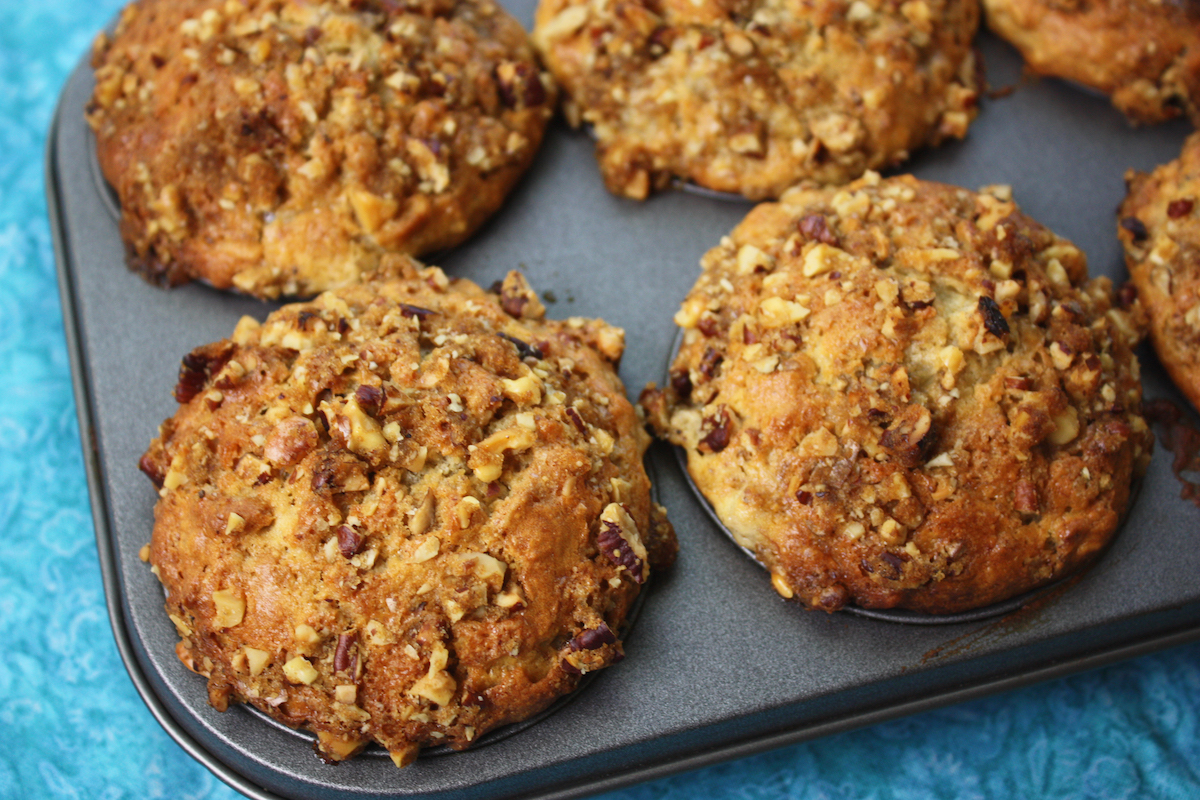
If you’re like me and your favorite part of the muffin is the top, you will love these easy breakfast muffins. The crunchy tops are made with nuts, brown sugar, and a little vegetable oil, but you can use melted butter instead. I always try baking without butter so I use oil in the topping. A lot of muffins like this use walnuts but I think pecans have a lot more flavor so that’s what I use, and I toast them first. Toasted nuts just taste way better than raw.
The reason I only make six is because the tops won’t be crunchy the next day and also, they are so filling, you only need to eat one. Make them with all purpose flour or a mix of all purpose and whole wheat pastry flour for some extra fiber. And keep in mind that the riper the banana, the sweeter it will be. Click here for the recipe. – Jenny Jones
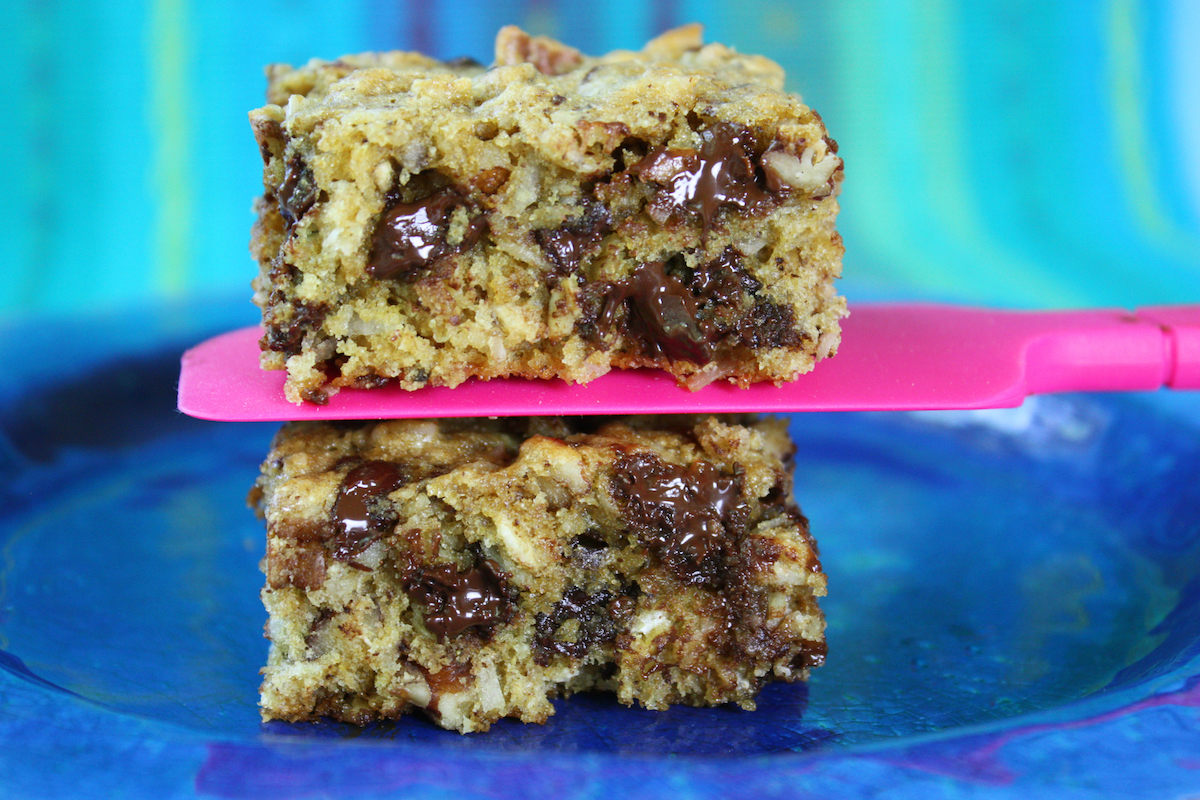
I love this! It’s a healthy dessert full of fiber and dark chocolate. It’s made with no white flour, no butter, and it’s a super easy one-bowl recipe. And if you line your pan with foil, there’s almost no cleanup. You can use walnuts but I find that pecans, especially when they are toasted first, have so much more flavor so they are my nuts of choice for most baking. In fact, I toast one bag at a time and keep them refrigerated for all my baking.
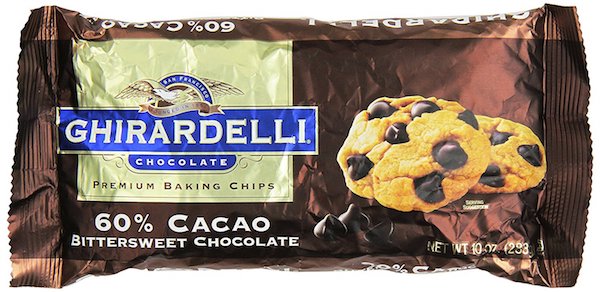
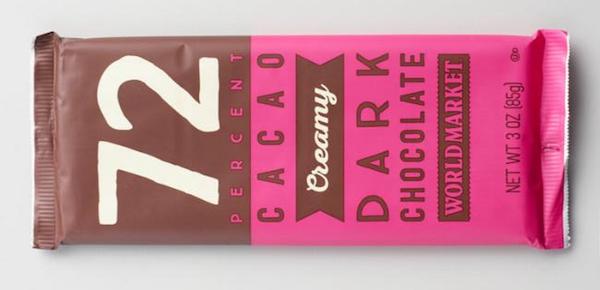
Now about the chocolate: Using a 70% dark chocolate bar is the healthiest choice and I like to use the 72% bar from World Market but you do have to chop it up so chocolate chips are definitely easier. I recently discovered Ghirardelli 60% dark chocolate chips and they are great but bigger than most so I did not like the result when I added them whole. So I chopped them into smaller pieces and an added benefit was there was more chocolate in every bite.
These are the chocolate chips I used, but I chopped them up first:
And here is what the World Market bar looks like:
My favorite thing, besides the delicious, chewy taste of this healthy dessert bar, is how incredibly easy it is. One bowl, no mixer, just mix it all up and bake. These healthy oatmeal chocolate chip bars are not just dessert – I must confess I also have them with breakfast. For a healthy dessert or a chewy oatmeal breakfast bar, just click here for the recipe. – Jenny Jones

 The fact is that homemade bread will not keep as well as store bought bread but in spite of that, homemade bread will always taste better. It’s best enjoyed the first day so after you have slathered the first few slices with butter (oh, yeah! ?) freezing what’s left on the first day is the best idea. I suggest slicing and freezing it so you can thaw only the slices you need. (I separate my slices between wax paper for easy separation.)