If your parchment paper stuck it’s from using an inferior brand. Reynolds brand always works for me. I got a cheaper parchment paper once and everything stuck to it. I only use Reynolds brand – it never sticks. (This is not a paid endorsement, I’m just sharing what works for me). NOTE: Wax paper is NOT the same as parchment paper. DO NOT USE WAX PAPER in the oven because it will melt onto your food.
My Parchment Paper Stuck
Substitutions
Don’t have whole wheat pastry flour? Regular whole wheat flour is not a good substitute for whole wheat pastry flour. It will give you a heavier and more dense product. Whole wheat flour is usually ground hard wheat that is high in gluten and best for baking bread. Whole wheat pastry flour is a much finer grind and is made from a soft wheat low in gluten. It is best for sweets like cakes, muffins, and cookies. Whole wheat pastry flour is available at Whole Foods and can easily be purchased online (King Arthur Flour has it). If you use my recipes regularly it’s worth the effort to find whole wheat pastry flour so you can add whole grains to your homemade baking.
Don’t have buttermilk? You cannot substitute milk for buttermilk. There is no perfect substitute for buttermilk, especially in baking. Due to its acidic nature, buttermilk makes baked goods lighter and fluffier so it’s worth using the real thing. You can freeze unused buttermilk in portions the size you will need for future recipes. It will separate when frozen but when you thaw it, just stir it back up. To substitute for buttermilk, there are several options:
1) Combine yogurt with milk, using plain yogurt and milk, about half and half.
2) Add 1 tablespoon of fresh lemon juice or distilled white vinegar to 1 cup of milk (not fat-free) and let it stand for 5 minutes or longer.
3) Combine sour cream with milk or water until it’s the thickness of buttermilk.
Don’t have bread flour? You can use all purpose flour. Bread flour has more protein than all-purpose flour and that helps with gluten development, which is helpful when working with yeast. With bread flour, pizzas may be a little crispier and breads may be a little chewier and have more body but it’s not a huge difference.
Don’t have instant yeast? Regular active yeast can be used wherever I use instant yeast. But be sure to check the package directions for the required temperature of the liquid. My brand of instant yeast calls for 120 degrees F while my regular active yeast calls for 110 degrees F.
Don’t have 1% milk or low fat milk? Use a mixture of 3 parts water to 1 part whole milk. For example, to make the equivalent of one cup of 1% milk: combine 3/4 cup water + 1/4 cup whole milk. (For 2% milk the mixture should be 50/50, i.e. half water and half whole milk)
Don’t have baking soda? Do not use baking powder instead. Baking powder is not a substitute for baking soda. Baking soda reacts with acidic ingredients in a recipe to make baked goods rise.
Don’t have extra light olive oil? For baking you can use any vegetable oil. My preference in avocado oil but they are not all the same. Some are too strong for baking. I use Chosen Foods brand avocado oil
Don’t have a Dutch oven? To see what other cooks have used in place of a Dutch oven, click here.
Don’t want to use eggs? I’m sorry to say I don’t know of any good substitute for eggs. For anyone with egg allergies, rather than change a recipe and risk being disappointed, you can find many eggless recipes the are already proven online. If cholesterol is a concern, all my research has shown that egg yolks may contain cholesterol but they are low in saturated fat and they do not raise serum cholesterol in the blood. Eggs also contain nutrients that may help lower the risk for heart disease, including vitamin B12, riboflavin, and folate. Besides providing protein, iron, phosphorus, iodine, and vitamin E, eggs are also one of the few natural sources of vitamin D.
The Difference Between Baking Powder & Baking Soda
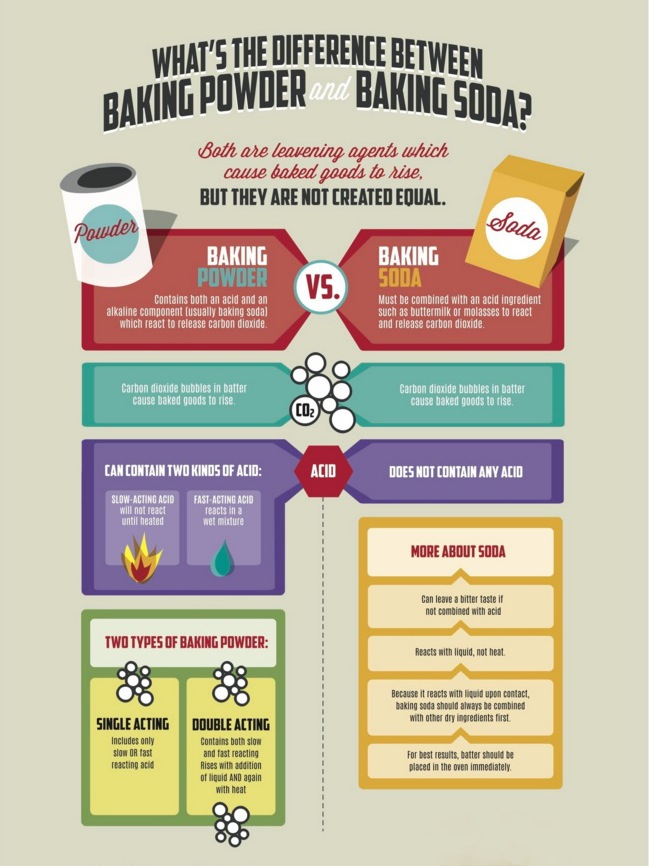
Baking powder and baking soda are NOT THE SAME. They can not be substituted for one another. They are both leaveners but they are chemically different.
Cake Strips to the Rescue
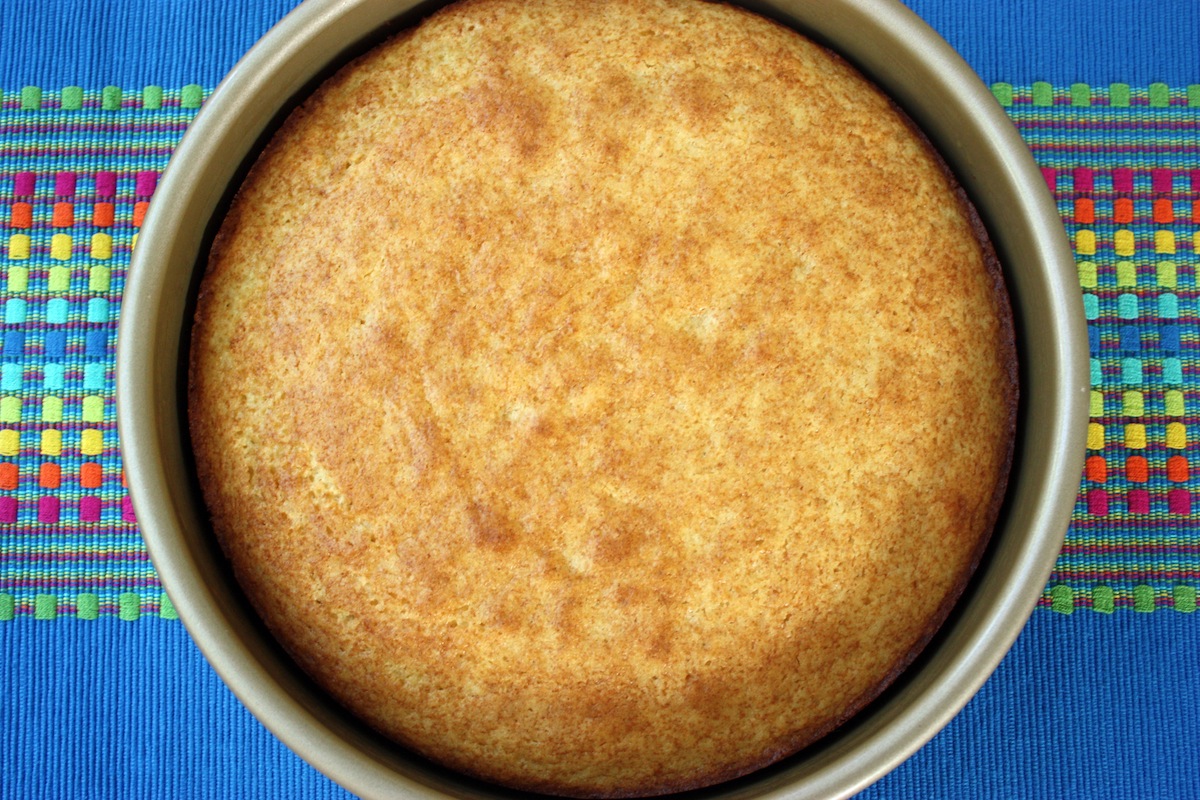
If you bake a lot of cakes there are two issues that need fixing. One is that they rise too much in the center and the other is that the edges get over-baked and dry. A cake strip will fix that. Here is my yellow cake baked with no cake strip. It’s domed in the middle and the edges are overdone and dry.
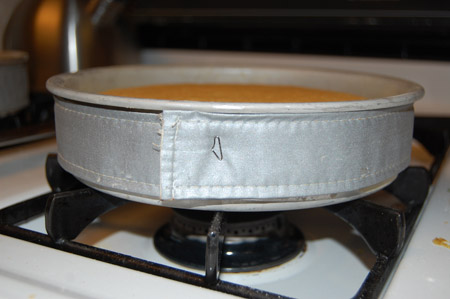
 A cake strip is easy to use. You just soak it in water for about 15 minutes, then press out the excess water and wrap it around the pan just before baking.
It protects the edge of the pan from getting too hot and the cake will bake evenly. If you can’t find one, you can fashion your own using fabric. I have never done that but you can find lots of how-to’s in the internet. They’re also called baking strips for cakes.
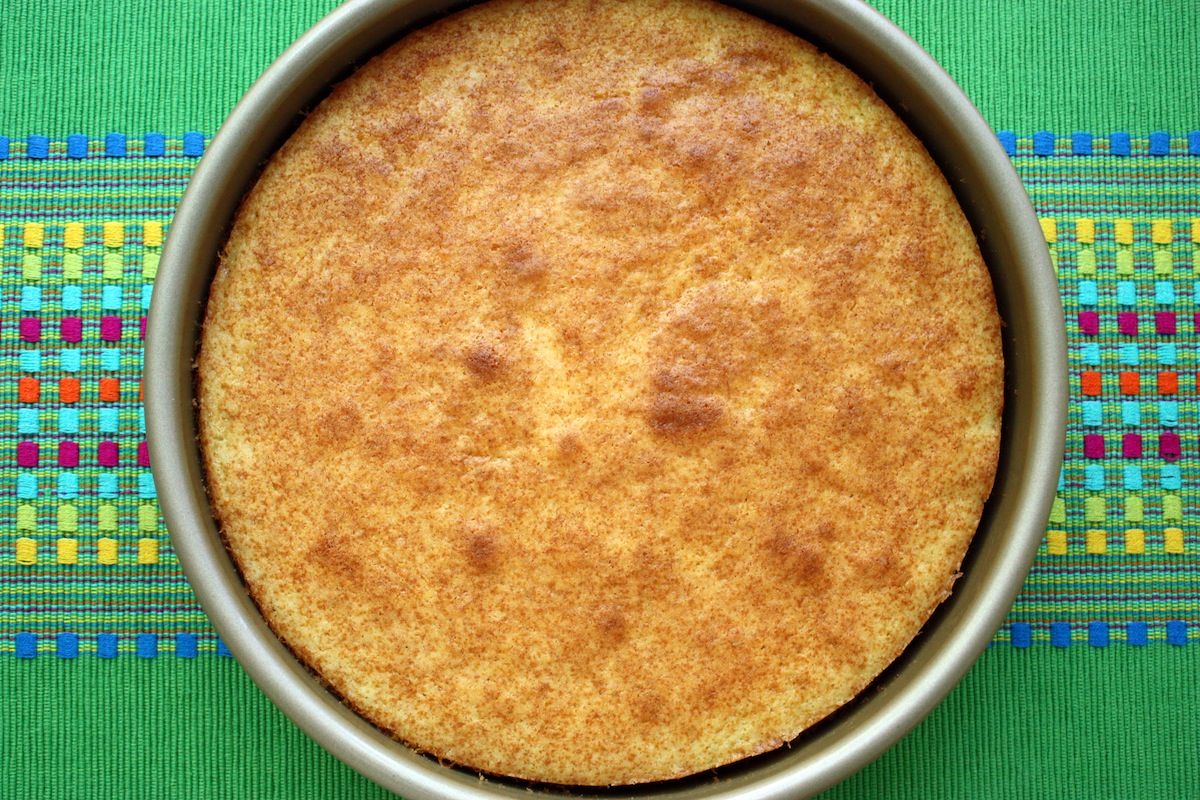
While working on this recipe I was surprised by something I learned about cake pans. It’s about the color. I always knew that a dark pan absorbs more heat so baked goods will brown more than in a light colored pan. But I baked two cakes, both with cake strips, in two different pans that I considered light colored. But look at the difference…
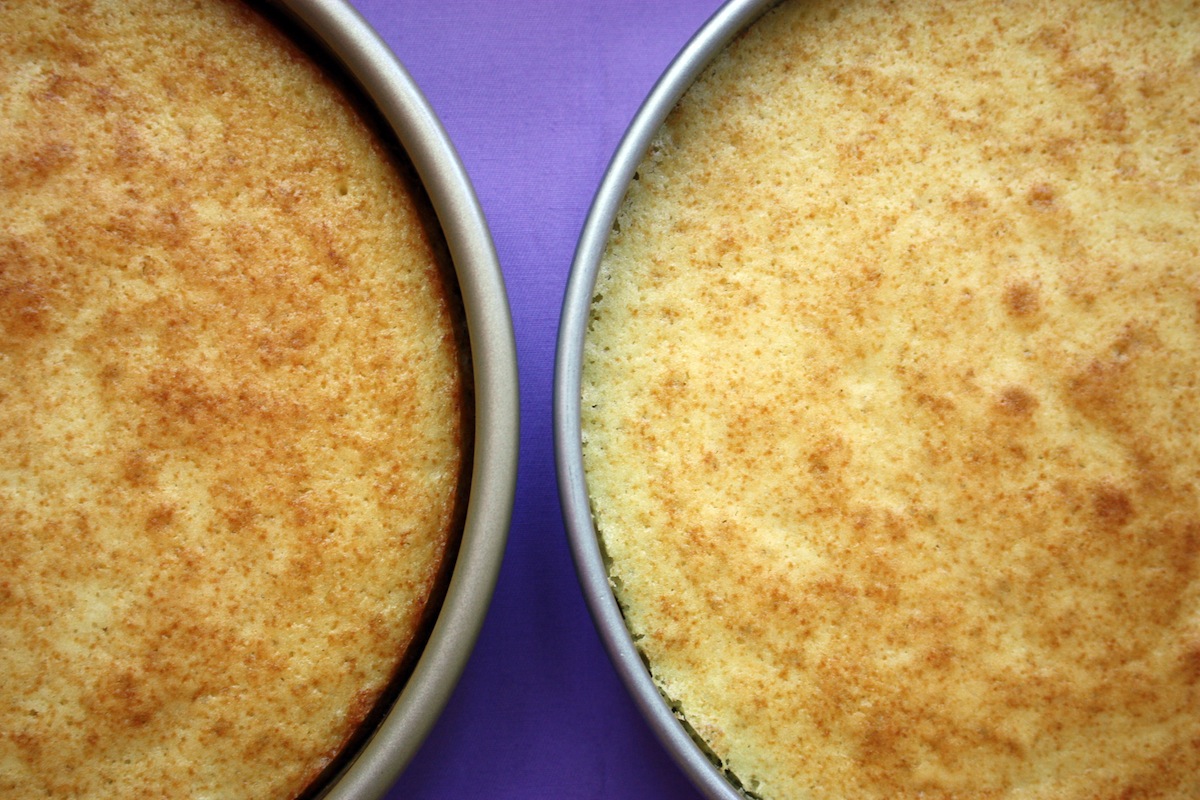 The pan on the left is my more expensive Williams-Sonoma Gold Touch pan that I never thought of as dark. The pan on the right is a cheaper silver colored pan (with no brand name so I don’t even know where I got it) but the cake in the cheaper silver pan came out perfectly. The edges were velvety soft and the cake didn’t brown too much. The one on the left was okay but the edges pulled away a bit and it browned a little more. Bottom line: use a silver colored pan and a cake strip for a perfect, soft, yummy cake.
Speaking of cake, this simple yellow cake is one of my easy-to-make healthier cakes and it’s my go-to cake for all kinds of frosting and filling. It’s soft and not super sweet… and it’s made without butter. I’ll be posting the recipe soon, so get your cake strips ready! – Jenny Jones
How To Store Parsley
I’ve had this parsley for over a month! If you’re tired of throwing away wilted parsley, you will love this easy way to store fresh parsley. Just put it in a glass of water and cover it loosely with a plastic produce bag. I use the bag I brought it home in from the store.
 Fresh parsley is great to use in cooking but I only use a little at a time. I used to keep it in the vegetable drawer in a plastic bag but I always had to throw it away before I could use it all up. There had to be a better way. So I tried putting it in a glass of water in the fridge and it kept a little longer but after a few days it was drying out.
The solution to drying out had to be plastic so I tried putting a light weight plastic produce bag loosely over the parsley and glass and I could not believe how long it lasted. I put it away on November 23rd. That was five weeks ago! And look at it today…
 I’ll be using this parsley until 2015! I’ll let you know when it finally runs its course – probably six or seven weeks. I just had to share!
How To Freeze Pecan Balls
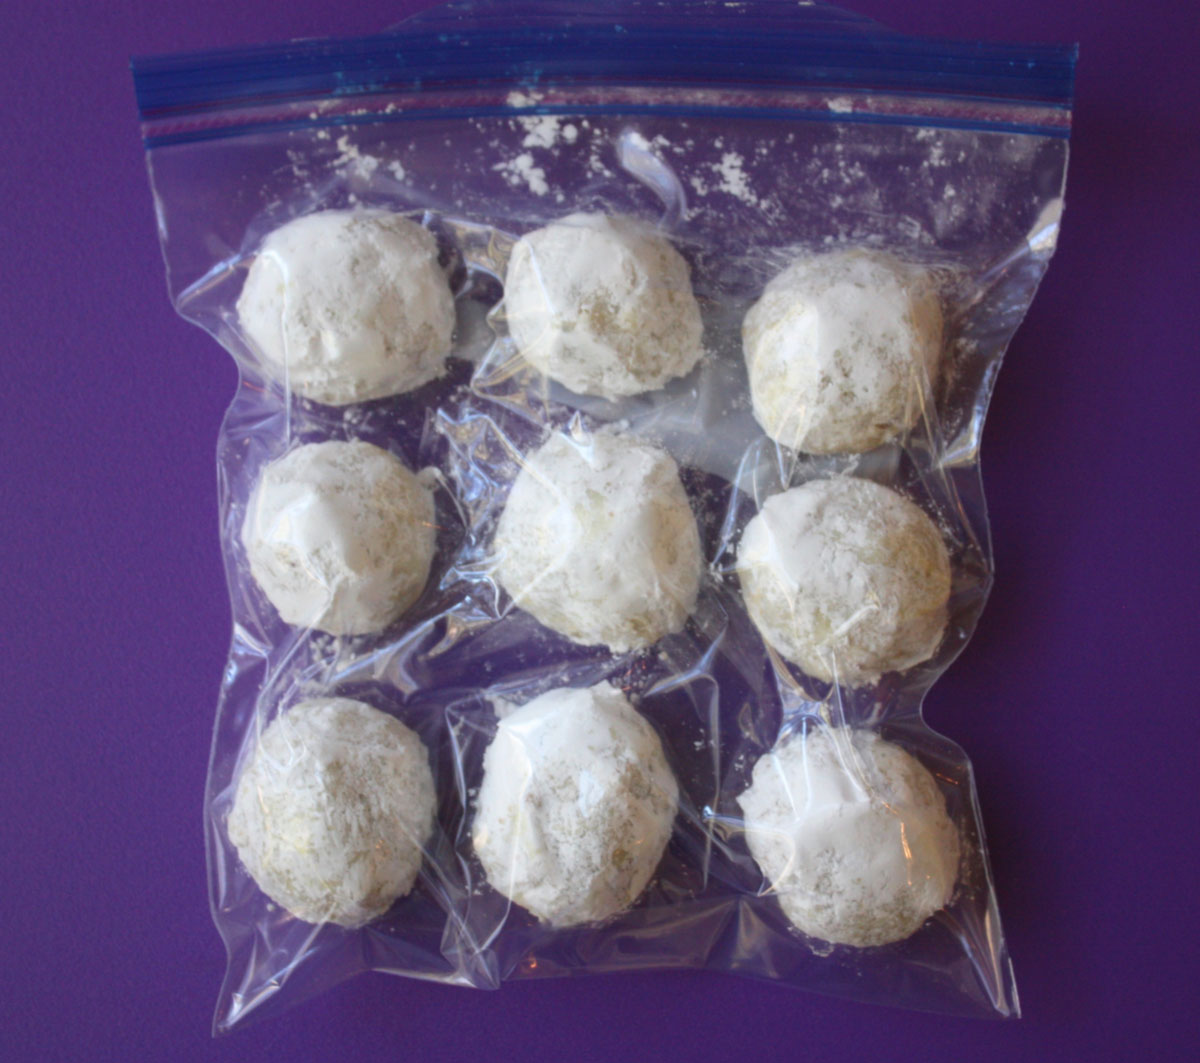 Guess what? There is no difference between frozen and freshly made pecan balls. I tested them myself and asked two other people to do a blind taste test and no one could tell the difference. This is good news because anything you can make ahead for the holidays is helpful. I’m sure there is more than one way to freeze these delicate Christmas snowball cookies but here is how I did mine:
- Once they were completely cool and after the second roll in powdered sugar I gently placed them in a freezer bag so they were not touching.
- I removed as much air as possible from the bag and placed them gently in the freezer.
- To thaw I let them thaw overnight in the refrigerator and then brought them to room temperature.
- Then I gently rolled them in powdered sugar again to freshen them up.
So there it is. This is how you can freeze your homemade pecan balls and have extra time for…. making more! To make these super easy Christmas cookies, click here for the recipe. – Jenny Jones
Metric Conversion Chart
PLEASE NOTE: I NEVER EXPECTED SO MANY INTERNATIONAL VISITORS AND HAD NO EXPERIENCE WITH MEASURING BY WEIGHT. THE GENERALLY ACCEPTED STANDARD FOR FLOUR IS LISTED IN BLUE AND HOW IT WEIGHS IN MY KITCHEN IN RED.
Flour
1 cup = 4 1/4 ounces = Generally Accepted 120 grams – When I weigh I get 125-130 grams
1/2 cup = 2 1/8 ounces = 60 grams / 63-65 grams
1/3 cup = 1 1/2 ounces = 40 grams / 42-43 grams
1/4 cup = 1.05 ounces = 30 grams / 31-32.5 grams
Granulated & Caster Sugar
1 cup = 7 ounces = 200 grams
1/2 cup = 3.5 ounces = 100 grams
1/3 cup = 2.3 ounces = 66 grams
1/4 cup = 1.75 ounces = 50 grams
1 Tablespoon = 0.45 ounces = 12.50 grams
Yeast
1 packet = 7 grams
1 teaspoon = 3 1/2 grams
1/4 teaspoon = 1 gram
Powdered Sugar & Powdered Cocoa
1 cup = 4 ounces = 114 grams
1/2 cup = 1.75 ounces = 50 grams
1/3 cup = 1.15 ounces = 33 grams
1/4 cup = .85 ounces = 25 grams
1 Tablespoon = 0.20 ounces = 6.25 grams
Liquids
1 cup = 8 ounces = 240 mL
1/2 cup = 4 ounces = 120 mL
1/3 cup = 2.6 ounces = 80 mL
1/4 cup = 2 ounces = 60 mL
1 Tablespoon = 0.50 ounce = 15 mL
Butter
1 Tablespoon = 0.50 ounce = 14 grams
1/4 cup = 2 ounces = 56 grams
1/3 cup = 2.6 ounces = 75 grams
1/2 cup = 4 ounces = 113 grams
1 cup = 8 ounces = 226 grams
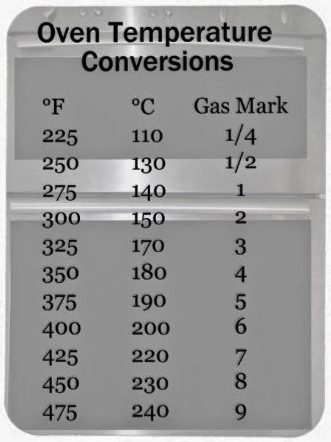
Oven Baking Temperatures
225 degrees F = 110 degrees C = 1/4 gas number
250 degrees F = 130 degrees C = 1/2 gas number
275 degrees F = 140 degrees C = 1 gas number
300 degrees F = 150 degrees C = 2 gas number
325 degrees F = 165 degrees C = 3 gas number
350 degrees F = 180 degrees C = 4 gas number
375 degrees F = 190 degrees C = 5 gas number
400 degrees F = 200 degrees C = 6 gas number
425 degrees F = 220 degrees C = 7 gas number
450 degrees F = 230 degrees C = 8 gas number
475 degrees F = 245 degrees C = 9 gas number
500 degrees F = 260 degrees C = 10 gas number
…Below are all the charts I had perviously posted, compiled from other sources…
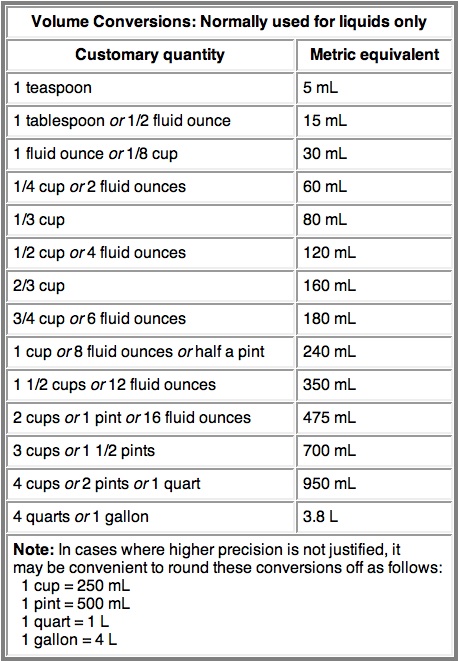
Liquids (and Herbs & Spices)
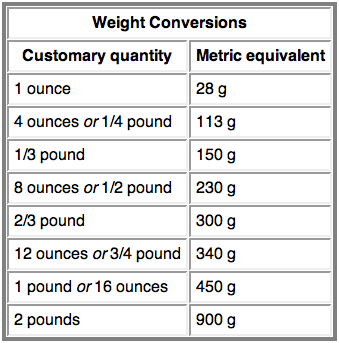
Weight
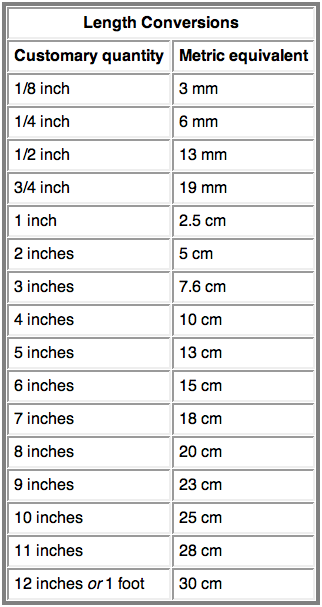
Length (1 cm = 10 mm)
Temperature
The Difference Between Yams and Sweet Potatoes
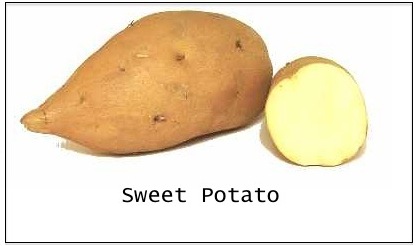
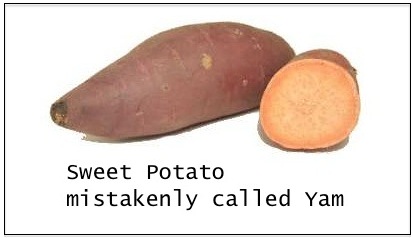
Are you making candied yams this Thanksgiving? Guess what? Candied yams are not yams. They are sweet potatoes! Check this out:
1) This is a sweet potato…
2) And this is a sweet potato…
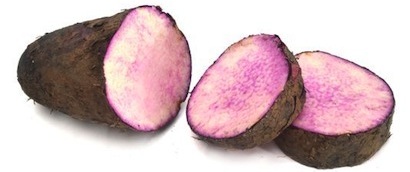
3) THIS is a Yam…
1) The yellow sweet potato, the one commonly called sweet potato, has a thicker skin and firm yellow flesh that’s a bit drier and starchier than the orange one.
2) The orange sweet potato, also called “red garnet” and “jewel,” has a softer skin and a deep orange flesh that when cooked, becomes very soft, almost like mashed potatoes. Plus they are sweeter than the yellow ones. These deeper colored sweet potatoes have more vitamin A than carrots.
3) Yams, which have a black bark-like skin, are native to Africa and Asia and I doubt if you could even find one here in the U.S.
There’s so much confusion about the difference between a yam and a sweet potato. That’s because the USDA labeled the orange ones “yams” to differentiate the two main varieties of sweet potatoes but the truth is, sweet potatoes and real yams are not even related. Most of us have never even eaten a yam.
So the bottom line is… unless the Supreme Court intervenes, we will continue to call the yellow ones sweet potatoes and the orange ones yams. It’s just simpler. The good news is they are interchangeable in most recipes, even candied yams. Besides vitamin A, these vegetables have lots of fiber, calcium, iron, and vitamin E so try to cook with them all year. I use the yellow ones for sweet potato fries and with my roasted vegetables and the orange ones for baking my sweet potato chocolate cake.
Well, this is good information but it doesn’t really change anything, does it? Happy Thanksgiving!
Parchment Paper vs. Wax Paper
Are parchment paper and wax paper the same?
My response… Parchment paper and wax paper are very different. Wax paper is actually coated with wax and not intended for use in the oven. The wax would probably melt in there anyway and wind up on your food. It’s good to use for messy work like rolling dough and breading or you can sift dry ingredients on it to save washing a bowl. Parchment paper is grease and moisture-resistant and is made for use in the oven, perfect for lining pans and baking sheets for easy removal. If your parchment paper sticks, it’s likely an inferior quality paper. The only brand I use is Reynolds and it never sticks.
How To Measure Ingredients
Professional bakers generally weigh ingredients but I don’t consider that practical so I do what I think most of us do, which is use measuring cups and spoons. Measuring liquids is pretty simple and requires a glass or plastic cup with markings that should be viewed at eye level, but dry ingredients are where recipes are affected the most. The proper way to measure flour is to first stir the flour in its container in case it has settled too much and become compacted. Then you are supposed to spoon it into your dry (stackable) measuring cup. Since I bake so much I keep my flour in a covered container but I always stir it first before measuring. My method is “dip and level” meaning that after I stir the flour around in the container, I dip my measuring cup into the flour, do not tap or shake the cup, and then I level off the top with a knife. I dip and level with sugar also but it does not tend to settle as much as flour. With small dry ingredients like spices, baking powder, etc. I just dip in the measuring spoon, scoop it up and then level off with a knife. I think most failures in baking happen by not stirring and aerating the flour first.
Here’s some advice I have based on some mistakes I have made:
1) Never measure liquid things like vanilla or oil in a measuring spoon over the bowl you’re working in – it can easily spill over into your bowl and there’s no way to fix it.
2) Never break an egg directly into a batter but always into a small bowl or cup first. You’d be surprised how often you’ll find a piece of egg shell.
3) When baking with cocoa powder sift it together with the other dry ingredients because it’s not always easy to incorporate it later.
I also found a couple of helpful links below…
http://allrecipes.com/video/30/how-to-measure-ingredients/detail.aspx
