Blog

Blog

Jan 14, 2015

Breakfast Brownies

breakfast_brownies_600
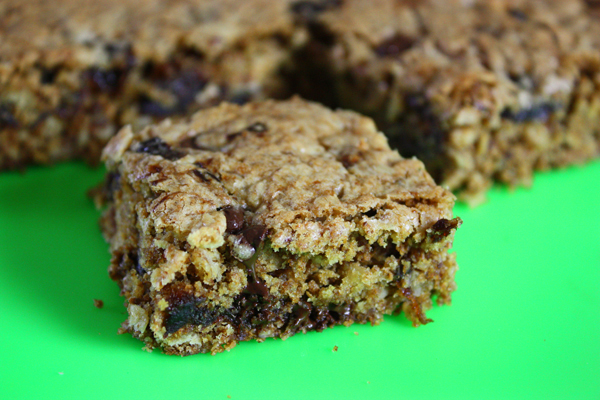
Are you getting enough fiber? Well now you can! Just make my super high fiber breakfast brownies made with every kind of fiber I could think of. I make them with oats, high fiber bran cereal, whole wheat flour, prunes and even olive oil, so there’s no white flour and no butter. Did I mention the chocolate chips?? You do know that dark chocolate is good for the heart so use the darkest chocolate chips you can find. Now let’s talk about the ingredients you will need:

Oats – I use regular Quaker Rolled Oats in the round carton.

Flour – I use whole wheat pastry flour, any brand I can find.

Cereal – I use Kellog’s All Bran Original cereal, which has 10 grams of fiber in 1/2 cup. If you can’t find it, look for an equally high-fiber cereal.

Oil – I use extra light olive oil but you can use a different oil if you like.

Chocolate Chips – I use either semi-sweet chocolate chips or I chop up some of a 62% Scharffen Berger chocolate bar.

Prunes – This is important. I use Sunsweet Premium Prunes in a can and they are very soft and moist. I even took a picture to show you how moist they are and their moisture is key to keeping these chewy bars moist. If you chop up regular dried prunes, the bars will be dry.

IMG_0951
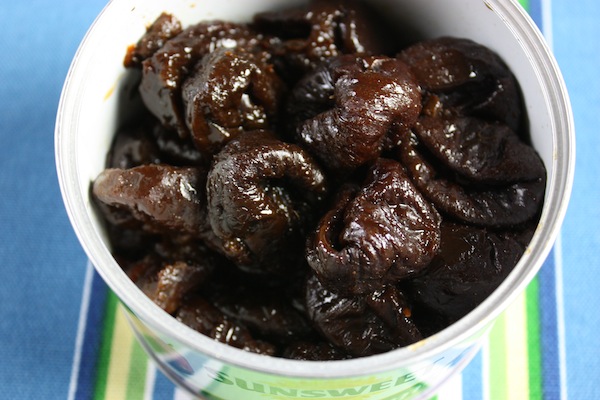
If you can’t find these prunes in a can, you can pour boiling water over regular dried prunes, cover, and let them stand for 15 minutes. Then drain and chop. I experimented with it and they come out softer for sure, but not quite as soft as the canned ones. But it’s the best I can come up with for my international cooks who can’t find these American products.

This recipe is similar to my giant breakfast cookies with a few changes. I call them breakfast brownies but you can call them prune bars or high fiber bars. Fiber is beneficial for many reasons.  Besides preventing constipation, fiber can help you maintain a healthy weight and lower your risk of diabetes and heart disease. But to eat fiber it has to taste good and that’s where I come in. Click here for the recipe. – Jenny Jones

Filed Under: Breakfast
7 Comments
Jan 10, 2015

Cake Strips to the Rescue

If you bake a lot of cakes there are two issues that need fixing. One is that they rise too much in the center and the other is that the edges get over-baked and dry. A cake strip will fix that. Here is my yellow cake baked with no cake strip. It’s domed in the middle and the edges are overdone and dry.

What Are Cake StripsAnd here it is with a cake strip – perfectly flat and the edges are soft and evenly baked.

IMG_6091 copyA cake strip is easy to use. You just soak it in water for about 15 minutes, then press out the excess water and wrap it around the pan just before baking.

bcake_wrap

It protects the edge of the pan from getting too hot and the cake will bake evenly. If you can’t find one, you can fashion your own using fabric. I have never done that but you can find lots of how-to’s in the internet. They’re also called baking strips for cakes.

While working on this recipe I was surprised by something I learned about cake pans. It’s about the color. I always knew that a dark pan absorbs more heat so baked goods will brown more than in a light colored pan. But I baked two cakes, both with cake strips, in two different pans that I considered light colored. But look at the difference…

Cake Pans1200_6284The pan on the left is my more expensive Williams-Sonoma Gold Touch pan that I never thought of as dark. The pan on the right is a cheaper silver colored pan (with no brand name so I don’t even know where I got it) but the cake in the cheaper silver pan came out perfectly. The edges were velvety soft and the cake didn’t brown too much. The one on the left was okay but the edges pulled away a bit and it browned a little more. Bottom line: use a silver colored pan and a cake strip for a perfect, soft, yummy cake.

Speaking of cake, this simple yellow cake is one of my easy-to-make healthier cakes and it’s my go-to cake for all kinds of frosting and filling. It’s soft and not super sweet… and it’s made without butter. I’ll be posting the recipe soon, so get your cake strips ready! – Jenny Jones

Jan 9, 2015

Salmon Patties

One of the healthiest recipes I make is my salmon patties. Now here’s a how-to video that shows just how easy it is to make a meal that benefits your heart, brain, eyes, joints, even your skin and hair, not to mention the cancer protection provided by salmon.

And canned salmon makes this a healthy dinner you can make any time without a trip to the fish market. The patties come together very quickly with just a few ingredients so the whole process, start-to-finish, takes less than 15 minutes.

Let’s talk about what to serve with these delicious fish cakes. Here are some things I have served with my salmon patties:
– Steamed chunks of sweet potato
– My oven-roasted sweet potato fries
– My Greek lemon potatoes
– Chopped salad
– My rice with kale
– My roasted vegetables
– Rice and steamed broccoli
– My roasted Brussels sprouts & potatoes
– My spaghetti with chard (my favorite!)

One of my visitors even made the patties into burgers so now you have lots of ways to try this easy recipe that’s bursting with health benefits. Click here for the recipe. – Jenny Jones

Filed Under: Videos 22 Comments
Jan 6, 2015

Easy Tortilla Pie

Best Recipe Tortilla Pie You only need a few basic ingredients to make this easy tortilla pie: whole wheat tortillas, canned beans, bottled salsa, peppers, and reduced fat cheese. Add some onions and garlic and this comes together pronto in a yummy, stick-to-the-ribs dinner the whole family will love.

Here’s why I love my easy tortilla pie: It has two different kinds of beans, black and cannellini beans; It has three different colors of pepper – red, green and yellow; And it’s made with whole wheat tortillas. Even if you aren’t a fan of whole wheat tortillas, they become so soft when baked with my sauce and cheeses, you can eat this moist layered casserole with a spoon.

There’s a recipe for tortilla pie in my original cookbook but this new recipe is simpler, faster, and healthier, not to mention even more delicious. This is an easy recipe to customize and make your own. If you like is spicy, be sure to include the jalapeño pepper and get a jar of spicy salsa. If you like it mild, you can leave out the jalapeño pepper altogether and replace it with extra bell pepper, or a milder Anaheim pepper, and use a mild salsa.

Here are a couple of brands I use in this recipe:

Tortillas – Trader Joe’s Whole Wheat Tortillas

Salsa – Green Mountain Gringo from Whole Foods

I make my pie in an 8-inch round pyrex baking dish with tall sides and a glass lid. Sometimes I cut the tortillas to fit exactly into the baking pan and with this pan, the filling all stays inside and doesn’t spill out. A lot of recipes use a springform pan and if you have one, that’s the pan to use. You can also make this tortilla pie in any kind of pie pan, preferably deep dish. Some of the beans may spill out but who cares? Just make sure you cover it well with foil.

Nutritionally, this healthy meal is hard to beat. There is lots of fiber in the beans as well as the tortillas, and beans also provide calcium and protein. The colored peppers are full of antioxidants to help protect against diseases like heart disease and cancer. And if you make it spicy, spicy foods boost metabolism and that helps with weight loss. But the best reason of all to make this easy casserole is it’s simply delicious. And it’s meatless, too. Click here for the recipe. – Jenny Jones

Jan 1, 2015

Questions?

BEFORE ASKING A QUESTION... please look in the FAQs at the top for answers to many commonly asked questions. Or maybe it’s something you can research on your own or find in the recipe comments.  I can’t always keep up with responding so thank you for understanding.

❤️???? My thanks to everyone who jumps in to help answer questions. ❤️????

Jan 1, 2015

I Never Expected This

I never expected that so many people would come to my website and watch my videos – over 40,000 people a day! And it’s wonderful. I am thrilled with all the feedback, but it’s becoming hard to keep up with the questions.  I’m doing my best but the numbers keep growing and it’s getting harder and harder to keep up. I’m truly dumbfounded to see the thousands of people who visit here every day.

I never did this for money. I did it for my love of cooking and I just wanted to share my recipes. So please understand if I have not answered your question. I’ve addressed the most commonly asked questions in my new Questions category. You’ll also see a lot of helpful comments under each recipe from other cooks that might address your concern.

I wasn’t expecting this. I’m just a home cook sharing what I love as a hobby. I’m humbled and so very appreciative of your kindness and support but this is a one-woman operation and I’m doing the best I can. Before asking a question, please try to look for answers here or on the internet. I’ll try to keep up but seriously… 40,000 people a day from 190 countries! And 50,000 on the weekends!! This is crazy! For commonly asked questions click here.Jenny Jones

Filed Under: General
18 Comments
Dec 27, 2014

How To Store Parsley

I’ve had this parsley for over a month! If you’re tired of throwing away wilted parsley, you will love this easy way to store fresh parsley. Just put it in a glass of water and cover it loosely with a plastic produce bag. I use the bag I brought it home in from the store.
IMG_0418Fresh parsley is great to use in cooking but I only use a little at a time. I used to keep it in the vegetable drawer in a plastic bag but I always had to throw it away before I could use it all up. There had to be a better way. So I tried putting it in a glass of water in the fridge and it kept a little longer but after a few days it was drying out.

The solution to drying out had to be plastic so I tried putting a light weight plastic produce bag loosely over the parsley and glass and I could not believe how long it lasted. I put it away on November 23rd. That was five weeks ago! And look at it today…

IMG_0695I’ll be using this parsley until 2015! I’ll let you know when it finally runs its course – probably six or seven weeks. I just had to share!

Dec 25, 2014

Merry Christmas

Merry Christmas to all my cooking friends.

ada85ad506a9204d5840b640d8cab712What a beautiful creation! I did not make this gingerbread house but I would like to live there.

I hope all your holiday creations turned out.

Dec 11, 2014

How Do I Print a Recipe?

There is a “Print” button at the top of the recipe, just to the right of the title. Click the “Print” button and follow the prompts on your computer.

Having problems? If you are using a desktop computer, for some reason, in some browsers (like Google Chrome), the “print menu window” appears to load faster than the actual recipe page you’re trying to print. To address this problem please close the print window and then click the Print button again. I hope this helps. You can also right click on any recipe page and select the “Print” option from the dropdown menu. Another option is to use the “Share” buttons at the upper right of each recipe to share any recipe or to email it to yourself.

Dec 11, 2014

Polish Chrusciki (Angel Wings)

This is the only think I deep fry… but I don’t care. Chrusciki are too good not to have at Christmas time and there is no way to make them without frying. And there is no way to eat just one.

These dainty powdered sugar delights, which are also called angel wings, also called bow ties, also called faworki, etc., are absolutely delicious thanks to the delicate flavor of vanilla and fresh citrus peel. As dramatic as they look, they are easier to make than you think.

I learned from my mother who made them every Christmas. She rolled the dough and my sister and I shaped them into knots or bow ties. She made a whole bunch at one time but I find it more manageable to work with a smaller dough and take up less counter space. Besides, if I made more I would just eat more. I’ve never seen anyone eat just one.

So here is my how-to video. I tried to keep it simple so even inexperienced cooks can make these fabulous holiday cookies. The most important thing is to roll the dough super thin so be patient. It takes me two minutes to get it thin enough and I’ve been making them for years.

You roll half the dough at a time and it needs to be at least 12 by 12 inches or 14 by 10 or 16 by 8, etc.. The shape doesn’t matter as long as you have around 140 square inches. You should be able to almost see through the dough.

I hope you try my Polish chrusciki and if you make them, send me a photo for my scrapbook. Click here for the recipe. – Jenny Jones

Filed Under: Videos 1 Comment